リアルタイムマルチプレイヤー
WASD キーを使用してプレイヤーを移動します。カプセルが 1 つしか表示されない場合は、別のタブまたは別のコンピューターでこのページを開いてみてください。
In this tutorial we’ll cover how to setup a basic multiplayer project using Node.js and Socket.io. We’ll focus on implementing it in PlayCanvas. By the end you should have a project similar to the one above. You can find the tutorial project here.
サーバーのセットアップ
ピアツーピアではなく、クライアントとサーバーのモデルを実装します。これは、すべてのクライアント(PlayCanvasのインスタンス)からデータを受信し、ブロードキャストします。
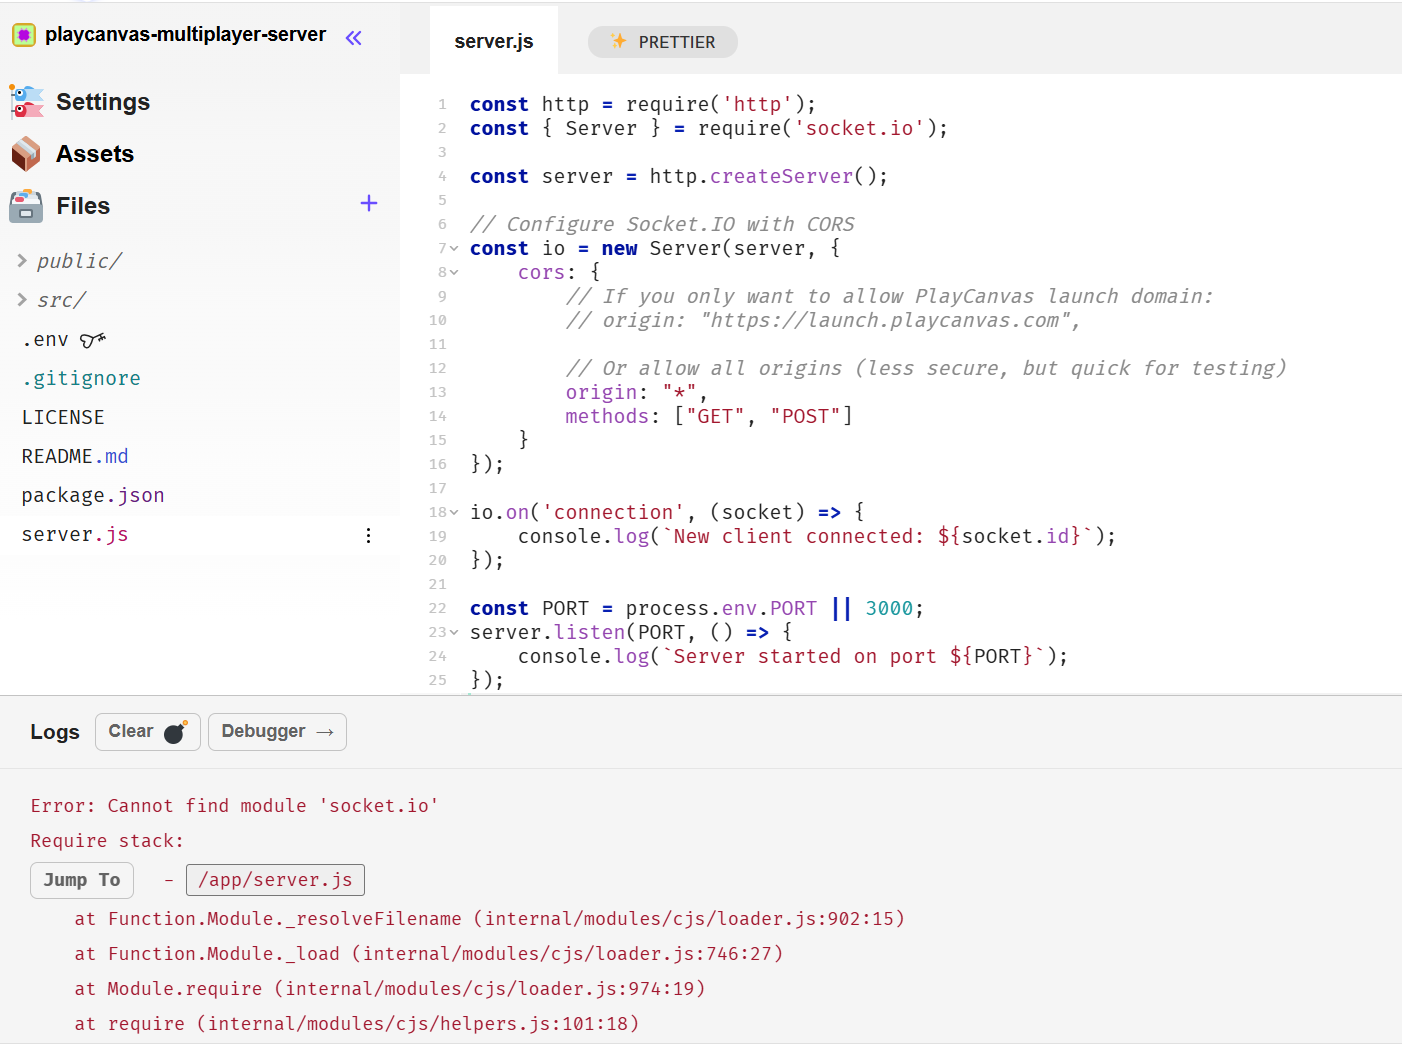
Glitch provides a really convenient way to write and deploy backend apps for free completely in your browser! You can use it without an account but creating one will let you easily find your work. Create a new Node app and replace the contents of server.js with this:
const http = require('http');
const { Server } = require('socket.io');

const server = http.createServer();

// Configure Socket.IO with CORS
const io = new Server(server, {
    cors: {
        // If you only want to allow PlayCanvas launch domain:
        // origin: "https://launch.playcanvas.com",

        // Or allow all origins (less secure, but quick for testing)
        origin: "*",
        methods: ["GET", "POST"]
    }
});

io.on('connection', (socket) => {
    console.log(`New client connected: ${socket.id}`);
});

const PORT = process.env.PORT || 3000;
server.listen(PORT, () => {
    console.log(`Server started on port ${PORT}`);
});
Glitch will automatically re-run the server every time you finish typing. Once you’ve copied this, you should get an error. Click on the Logs button at the bottom of the window to open up the server console. Here you can see any server output, as well as the errors. You should see Error: Cannot find module 'socket.io'.
パッケージを含めるには、package.json に移動し、トップの Add Package ボタンをクリックします。 socket.io を検索します。
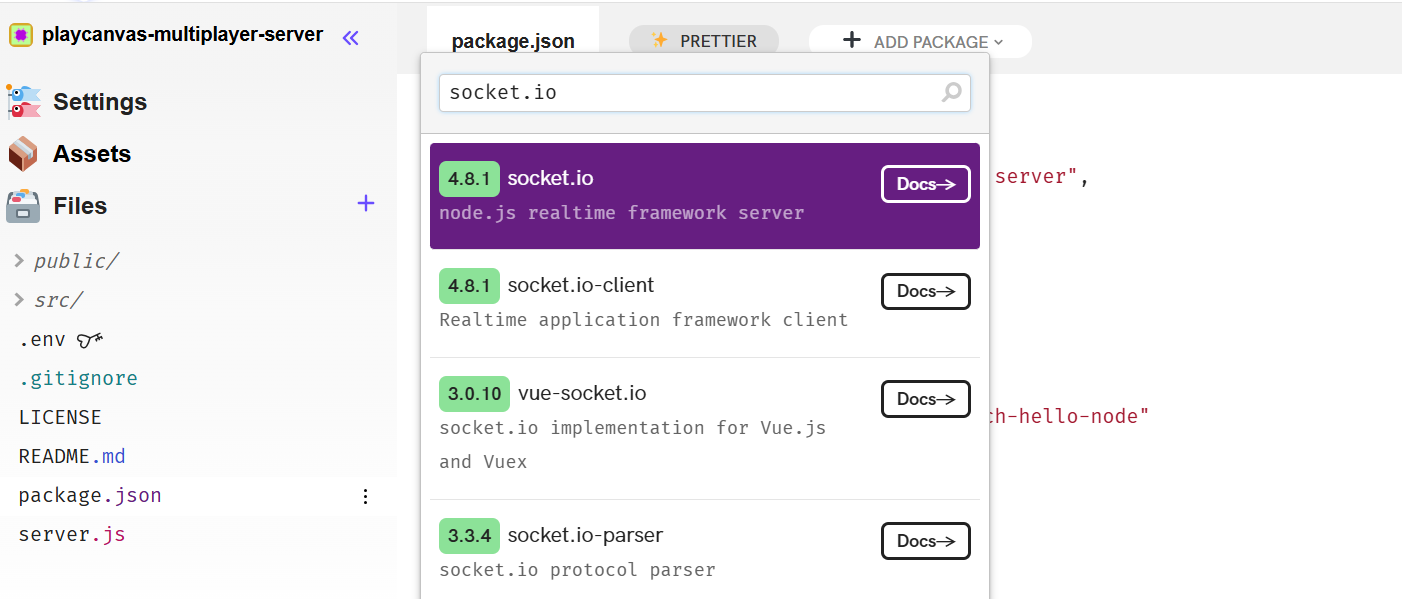
Once socket.io has finished installing, the server will automatically restart and you should see Server started on port 3000 in the log. Congratulations! You've successfully deployed a server!
You can find the domain your server is deployed at by clicking Settings in the left sidebar. This is where you can also rename the project.
このサーバーは、誰かが接続するたびにメッセージをログに記録するだけです。これでクライアントが接続して、サーバーに接続したことを確認できます。
プロジェクトのセットアップ
Create a new project on PlayCanvas. We first need to include the Socket.io client JS library, as an external script. To do this. go to your project settings:

'External Scripts'を見つけて開きます。
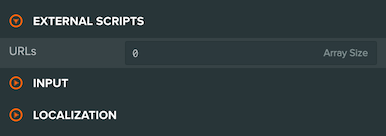
Change the value from 0 to 1 and add the CDN URL for the socket library from their framework server. In this case, we will be using version 4.8.1 as that is the latest at time of writing:
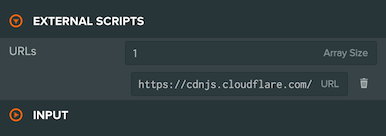
https://cdnjs.cloudflare.com/ajax/libs/socket.io/4.8.1/socket.io.min.js
次に、ネットワークロジックを処理する新しいスクリプトを作成する必要があります。 Network.jsという新しいスクリプトを作成します。最初に、サーバーに接続する必要があります。これは、initializeメソッドに次の行を追加することで行うことができます。
this.socket = io.connect('https://playcanvas-multiplayer-server.glitch.me');
Replace https://playcanvas-multiplayer-server.glitch.me with the address of your own server.
To confirm that this works, attach this network script to the Root entity, and then launch the game. Keep your eye on the server log at Glitch. If everything worked, the server should log New client connected: along with the client ID. The project is now setup to send and receive messages to and from the server.
サーバーとクライアントの通信
The way you can send data between the client and server is with the socket connection we made earlier. To send data from the client (in Network.js on PlayCanvas), we use the emit function. Here’s an example:
this.socket.emit('playerJoined', 'John');
This emits a message called playerJoined, with the data John. For the server to receive the message, we need to write in the server file (in server.js on Glitch):
socket.on('playerJoined', function (name) {
    console.log (name);
});
これは、playerJoinedが送信されたときにサーバーに送信されるデータをログに記録します。
このデモでは、リアルタイムマルチプレイヤーでプレイヤーが移動するようにしたいため、環境を作成する必要があります。グラウンドとして使用するエンティティを作成し、Collision (ボックス形状) とStaticタイプのRigidBodyを追加します。以下は、グラウンドエンティティの設定です:
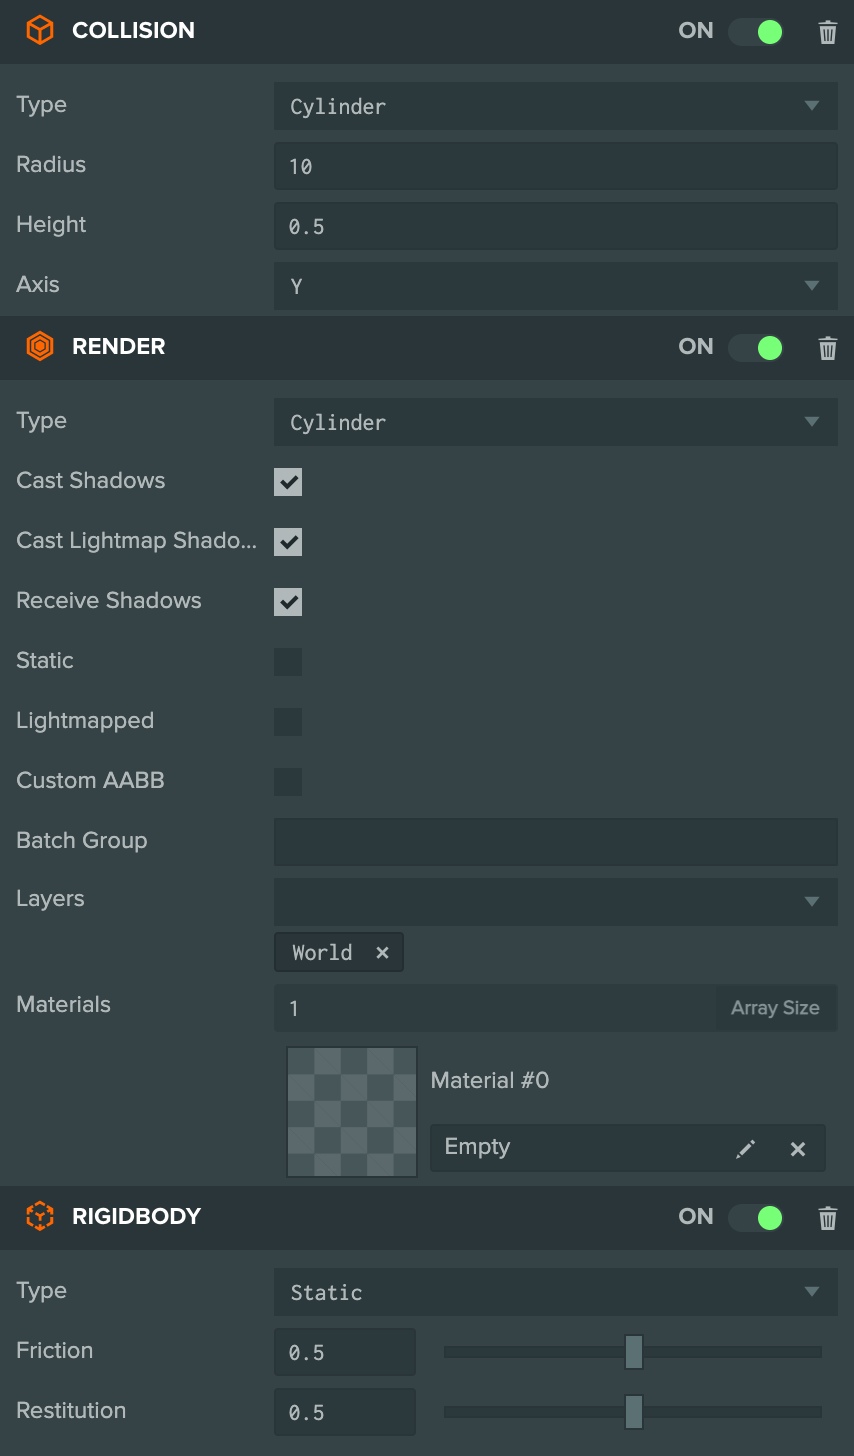
次に、操作するプレイヤーを作成する必要があります。新しいカプセルを作成し、 Player と呼びます。ダイナミックなリジッドボディと衝突ボックスを追加し、リジッドボディの設定を以下の画像のように変更します。

プレイヤーエンティティを複製し、 'Other' という名前に変更します。この新しいエンティティの Enabled ボックスをオフにして、最初は無効にします。これは、ゲーム内の他のプレイヤーをシミュレートするために使用するエンティティです。
プレイヤーにスクリプトコンポーネントを追加し、 Movement.js という新しいスクリプトをアタッチします。
var Movement = pc.createScript('movement');

Movement.attributes.add('playerSpeed', {
    type: 'number',
    default: 30,
    title: 'Player Speed'
});

// initialize code called once per entity
Movement.prototype.initialize = function() {
    this.force = new pc.Vec3();
};

// update code called every frame
Movement.prototype.update = function(dt) {
    var forward = this.entity.forward;
    var right = this.entity.right;
    var app = this.app;

    x = 0;
    z = 0;

    if (app.keyboard.isPressed(pc.KEY_A)) {
        x -= right.x;
        z -= right.z;
    }

    if (app.keyboard.isPressed(pc.KEY_D)) {
        x += right.x;
        z += right.z;
    }

    if (app.keyboard.isPressed(pc.KEY_W)) {
        x += forward.x;
        z += forward.z;
    }

    if (app.keyboard.isPressed(pc.KEY_S)) {
        x -= forward.x;
        z -= forward.z;
    }

    if (x !== 0 || z !== 0) {
        x *= dt;
        z *= dt;

        this.force.set (x, 0, z).normalize ().scale ((this.playerSpeed));
        this.entity.rigidbody.applyForce (this.force);
    }
};
When you launch the game you should be able to use WASD to move your player around. If not, you’ve missed a step or did not set the correct settings for the entity. Try changing the speed attribute on the movement script.
For the game to work in real time multiplayer, we need to keep track of all players in the game. Replace the current server code with this:
const http = require('http');
const { Server } = require('socket.io');

/**
 * Class to track each connected player (id + position)
 */
class Player {
    constructor(id) {
        this.id = id;
        this.x = 0;
        this.y = 0;
        this.z = 0;
    }
}

const server = http.createServer();

// Configure Socket.IO with CORS
const io = new Server(server, {
    cors: {
        // If you only want to allow PlayCanvas launch domain:
        // origin: "https://launch.playcanvas.com",

        // Or allow all origins (less secure, but quick for testing)
        origin: "*",
        methods: ["GET", "POST"]
    }
});

const players = {};

/**
 * Handle new socket connections
 */
io.on('connection', (socket) => {
    console.log(`New client connected: ${socket.id}`);

    // Fired when the client is ready to initialize their Player object
    socket.on('initialize', () => {
        const newPlayer = new Player(socket.id);
        players[socket.id] = newPlayer;

        // Send to this client its own ID and the current list of players
        socket.emit('playerData', { id: socket.id, players });

        // Tell everyone else about this new player
        socket.broadcast.emit('playerJoined', newPlayer);
    });
});

const PORT = process.env.PORT || 3000;
server.listen(PORT, () => {
    console.log(`Server started on port ${PORT}`);
});
上記のコードでは、プレイヤーが initialize メッセージを送信すると、ユニークなIDとゲーム内の他のプレイヤーのデータを送信します。また、他のプレイヤーが接続したことを通知します。これらのロジックを Network スクリプトに追加しましょう。
initialize に以下のコードを追加します。
// Your io.connect function call should be up here

this.socket.emit('initialize');
var socket = this.socket;

this.player = this.app.root.findByName('Player');
this.other = this.app.root.findByName('Other');

var self = this;
socket.on('playerData', function (data) {
    self.initializePlayers (data);
});

socket.on('playerJoined', function (data) {
    self.addPlayer(data);
});
そして、Network.js 内に以下の新しい関数を宣言します。
Network.prototype.initializePlayers = function (data) {
    this.players = data.players;
    Network.id = data.id;

    for (var id in this.players) {
        if (id != Network.id) {
            this.players[id].entity = this.createPlayerEntity(this.players[id]);
        }
    }

    this.initialized = true;
    console.log('initialized');
};

Network.prototype.createPlayerEntity = function (data) {
    // Create a new player entity
    var newPlayer = this.other.clone();
    newPlayer.enabled = true;

    // Add the entity to the entity hierarchy
    this.other.getParent().addChild(newPlayer);

    // If a location was given, teleport the new entity to the position of the connected player
    if (data)
        newPlayer.rigidbody.teleport(data.x, data.y, data.z);

    return newPlayer;
};

Network.prototype.addPlayer = function (data) {
    this.players[data.id] = data;
    this.players[data.id].entity = this.createPlayerEntity(data);
};
ここでゲームに参加すると、クライアントがサーバーに接続したことを伝え、サーバーからプレイヤーのリストとその位置を受信します。その後、接続されている各プレイヤーに対して新しいエンティティを作成し、現在の位置に移動します。唯一の問題は、サーバーがすべてのプレイヤーの位置を把握していないことです。現在位置を1フレームごとにサーバーに送信する必要があります。
これらのコードを Network.js の initialize に追加します。
socket.on('playerMoved', function (data) {
    self.movePlayer(data);
});
update を以下のコードで置き換えます。
Network.prototype.update = function (dt) {
    this.updatePosition();
};
そして、Network.js 内に以下の新しい関数を宣言します。
Network.prototype.movePlayer = function (data) {
    if (this.initialized && !this.players[data.id].deleted) {
        this.players[data.id].entity.rigidbody.teleport(data.x, data.y, data.z);
    }
};

Network.prototype.updatePosition = function () {
    if (this.initialized) {
        var pos = this.player.getPosition();
        Network.socket.emit('positionUpdate', {id: Network.id, x: pos.x, y: pos.y, z: pos.z});
    }
};
サーバーに戻り、プレイヤーが自分の位置を送信した場合にどうなるかを考慮する必要があります。サーバーで新しいイベントを追加する必要があります。
// Update player position
socket.on('positionUpdate', (data) => {
    if (!players[socket.id]) return;
    players[socket.id].x = data.x;
    players[socket.id].y = data.y;
    players[socket.id].z = data.z;

    // Broadcast updated position to all other players
    socket.broadcast.emit('playerMoved', {
        id: socket.id,
        x: data.x,
        y: data.y,
        z: data.z
    });
});
Finally, we need to handle player disconnects. We can do this by listening for the disconnect event on the socket.
// Handle disconnections
socket.on('disconnect', () => {
    console.log(`Client disconnected: ${socket.id}`);
    if (!players[socket.id]) return;
    delete players[socket.id];
    // Notify other players to remove this player
    socket.broadcast.emit('killPlayer', socket.id);
});
Let's review the full and final server code:
const http = require('http');
const { Server } = require('socket.io');

/**
 * Class to track each connected player (id + position)
 */
class Player {
    constructor(id) {
        this.id = id;
        this.x = 0;
        this.y = 0;
        this.z = 0;
    }
}

const server = http.createServer();

// Configure Socket.IO with CORS
const io = new Server(server, {
    cors: {
        // If you only want to allow PlayCanvas launch domain:
        // origin: "https://launch.playcanvas.com",

        // Or allow all origins (less secure, but quick for testing)
        origin: "*",
        methods: ["GET", "POST"]
    }
});

const players = {};

/**
 * Handle new socket connections
 */
io.on('connection', (socket) => {
    console.log(`New client connected: ${socket.id}`);

    // Fired when the client is ready to initialize their Player object
    socket.on('initialize', () => {
        const newPlayer = new Player(socket.id);
        players[socket.id] = newPlayer;

        // Send to this client its own ID and the current list of players
        socket.emit('playerData', { id: socket.id, players });

        // Tell everyone else about this new player
        socket.broadcast.emit('playerJoined', newPlayer);
    });

    // Update player position
    socket.on('positionUpdate', (data) => {
        if (!players[socket.id]) return;
        players[socket.id].x = data.x;
        players[socket.id].y = data.y;
        players[socket.id].z = data.z;

        // Broadcast updated position to all other players
        socket.broadcast.emit('playerMoved', {
            id: socket.id,
            x: data.x,
            y: data.y,
            z: data.z
        });
    });

    // Handle disconnections
    socket.on('disconnect', () => {
        console.log(`Client disconnected: ${socket.id}`);
        if (!players[socket.id]) return;
        delete players[socket.id];
        // Notify other players to remove this player
        socket.broadcast.emit('killPlayer', socket.id);
    });
});

const PORT = process.env.PORT || 3000;
server.listen(PORT, () => {
    console.log(`Server started on port ${PORT}`);
});
最後に
以上です!お好みで、以下のアイデアを追加してみてください。
- プレイヤーがゲームを終了したときに削除されるようにする
- プレイヤーが端から落ちた場合の復帰機能を追加する
Keep in mind this is only a very basic implementation of multiplayer. Realistically, when creating larger multiplayer games you'll want to consider using an authoritative server, instead of handling all the game logic on the client. You can read a more in depth tutorial about how Socket.io works and how to develop multiplayer in JavaScript here.
You can find the full server code on Glitch here, where you can also fork it and extend it.