シンプルなゲームの作成 - パート4
- 完成されたプロジェクトはこちらです。先にその1, その2, その3を読んでください。*
サッカーボール
Keepy Upゲームはサッカーボールを使用します。プレイヤーの入力や環境(つまり重力)に反応し、音声を再生します。ゲームの最も複雑な部分です。可能な限りシンプルに説明します。
ball.js
var Ball = pc.createScript('ball');

Ball.attributes.add('gravity', {
    type: 'number',
    default: -9.8,
    description: 'The value of gravity to use'
});

Ball.attributes.add('defaultTap', {
    type: 'number',
    default: 5,
    description: 'Speed to set the ball to when it is tapped'
});

Ball.attributes.add('impactEffect', {
    type: 'entity',
    description: 'The particle effect to trigger when the ball is tapped'
});

Ball.attributes.add('ballMinimum', {
    type: 'number',
    default: -6,
    description: 'When ball goes below minimum y value game over is triggered'
});

Ball.attributes.add('speedMult', {
    type: 'number',
    default: 4,
    description: 'Multiplier to apply to X speed when tap is off center'
});

Ball.attributes.add('angMult', {
    type: 'number',
    default: -6,
    description: 'Multiplier to apply to angular speed when tap is off center'
});

Ball.tmp = new pc.Vec3();

// initialize code called once per entity
Ball.prototype.initialize = function() {
    this.paused = true;

    // Get the "Game" Entity and start listening for events
    this.game = this.app.root.findByName("Game");

    this.app.on("game:start", this.unpause, this);
    this.app.on("game:gameover", this.pause, this);
    this.app.on("game:reset", this.reset, this);

    // Initialize properties
    this._vel = new pc.Vec3(0, 0, 0);
    this._acc = new pc.Vec3(0, this.gravity, 0);
    this._angSpeed = 0;

    // Store the initial position and rotation for reseting
    this._origin = this.entity.getLocalPosition().clone();
    this._rotation = this.entity.getLocalRotation().clone();
};

// update code called every frame
Ball.prototype.update = function(dt) {
    // Don't update when paused
    if (this.paused) {
        this.entity.rotate(0, 30*dt, 0);
        return;
    }

    var p = this.entity.getLocalPosition();
    var tmp = Ball.tmp;

    // integrate the velocity in a temporary variable
    tmp.copy(this._acc).scale(dt);
    this._vel.add(tmp);

    // integrate the position in a temporary variable
    tmp.copy(this._vel).scale(dt);
    p.add(tmp);

    // update position
    this.entity.setLocalPosition(p);

    // rotate by angular speed
    this.entity.rotate(0, 0, this._angSpeed);

    // check for game over condition
    if (p.y < this.ballMinimum) {
        this.game.script.game.gameOver();
    }
};

/*
 * Called by the input handler to tap the ball up in the air
 * dx is the tap distance from centre of ball in x
 * dy is the tap distance from centre of ball in y
 */
Ball.prototype.tap = function (dx, dy) {
    // Update velocity and spin based on position of tap
    this._vel.set(this.speedMult * dx, this.defaultTap, 0);
    this._angSpeed += this.angMult * dx;

    // calculate the position of the tap in world space
    var tmp = Ball.tmp;
    tmp.copy(this.entity.getLocalPosition());
    tmp.x -= dx;
    tmp.y -= dy;

    // trigger particle effect to tap position, facing away from the center of the ball
    this.impactEffect.setLocalPosition(tmp);
    this.impactEffect.particlesystem.reset();
    this.impactEffect.particlesystem.play();
    this.impactEffect.lookAt(this.entity.getPosition());

    // play audio
    this.entity.sound.play("bounce");

    // increment the score by 1
    this.game.script.game.addScore(1);
};

// Pause the ball update when not playing the game
Ball.prototype.unpause = function () {
    this.paused = false;

    // start game with a tap
    this.tap(0, 0);
};

// Resume ball updating
Ball.prototype.pause = function () {
    this.paused = true;
};

// Reset the ball to initial values
Ball.prototype.reset = function () {
    this.entity.setLocalPosition(this._origin);
    this.entity.setLocalRotation(this._rotation);
    this._vel.set(0,0,0);
    this._acc.set(0, this.gravity, 0);
    this._angSpeed = 0;
};
スクリプト属性 (Script Attributes)
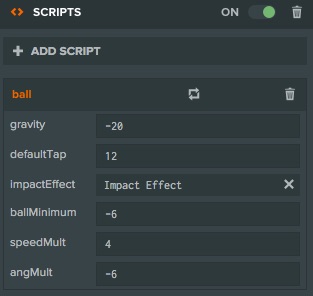
スクリプトの先頭には、定義したスクリプト属性のセットがあります。スクリプトの属性を定義することで、エディタにスクリプトから値を公開することができます。これを行う理由は3つあります。

まず、異なる値を持つ異なるエンティティに対して同じスクリプトを使用することができます。たとえば、色を設定するスクリプトの属性の場合、エディタでスクリプトの属性を変更するだけでエンティティの赤、青、緑のバージョンを作成できます。
二つ目は、迅速かつ容易にスクリプトの動作を調整することができるという理由です。スクリプト属性を変更すると(またはエディタから任意のプロパティ)エディタから起動しているゲームのインスタンスに対して即時に変更が加えられます。ここで定義するballMinimumプロパティの場合、ゲームを起動して、再読み込みすることなくボールを画面の下部から落下させるために必要なballMinimumの値をテストすることができます。ゲームをテストし、値を変更し、再びゲームをテストします。
これは "反復速度" として知られています。ゲームを変更してテストする速さが速ければ、開発をより迅速に進めることができます!
ボールにスクリプト属性を定義して、重力やボールをタップした際の弾みなどのゲームプレイプロパティの値を調整することができます。これらの属性を使用することで、好みに合わせて簡単にゲームを調整できます。
最後に、スクリプト属性はエンティティまたはシーン内のアセットにスクリプトをリンクするための素晴らしい方法です。例えば、ボールのスクリプトをタップしたときにパーティクルエフェクトをトリガーする必要があります。パーティクルエフェクトは、シーンで別のエンティティに添付されています。entityタイプのimpactEffectというスクリプト属性を定義し、エディタからパーティクルエフェクトを持つエンティティにリンクします。スクリプトはエンティティへの参照を持つようになり、コードを壊すことなくこのエンティティを変更したり、別のエンティティに変更することが可能になります。
物理のシミュレーション
基本的なベクトル数学の知識があればボールのupdate()ループは簡単ですが、ここではビデオゲームでボールをシミュレートする方法について少し説明します。
ビデオゲームで何かをシミュレートする簡単な方法は、そのオブジェクトに加速、速度および位置を与えることです。各タイムステップ(またはフレーム)で、加速度(速度の変化率)が速度を変更して、速度は(位置の変化率)が位置を変更します。次に、新しい位置でオブジェクトを描画します。
オブジェクトの位置は3つの方法で変更できます。
- 加速度の変更, これは重力のように、ボールに一定の期間力を適用する場合に便利です。
- 速度の変更, これは瞬間的な変化です。床から跳ね返るボールなど。
- 位置の変更, テレポーテーションのように、現実の世界では存在しないもの!
シミュレーションでは、重力による一定の加速度があります。ボールをタップすると速度に瞬時の変化を適用して、ゲームをリセットすると開始位置にボールをテレポートさせて戻します。
シミュレーション
Updateループは次のことを行います。
(速度の変更) = (加速) \* (最後のフレームから過ぎた時間)
(新しい速度) = (古い速度) + (速度の変更)
(位置の変更) = (新しい速度) \* (最後のフレームから過ぎた時間)
(新しい位置) = (古い位置) + (位置の変更)
コード内では次のようになります。
var p = this.entity.getLocalPosition();

// integrate the velocity in a temporary variable
tmp.copy(this._acc).scale(dt);
this._vel.add(tmp);

// integrate the position in a temporary variable
tmp.copy(this._vel).scale(dt);
p.add(tmp);

// update position
this.entity.setLocalPosition(p);
中間値を格納するためにtmpの一時的なベクトルを使用します。全てのフレームで新たなベクトルを作成することは避けるべきです。また、更新された位置を適用するため、setLocalPosition を呼び出す必要があります。
最後に、良い効果を得るためにentity.rotate()を使用して角速度値でボールに回転を追加します。これは物理的に正確ではありませんが、見た目が良いです。
入力に反応する
その2で説明したとおり、 input.jsスクリプトは入力がボールに当たったかどうかを確認して、当たった場合はtap()メソッドを呼び出します。上記で定義されたtap()メソッドは、ボールの速度と角速度に直接変更を適用します。this.speedMult や this.angMultなどのいくつかのスクリプト属性を使用して新しい速度および角速度を掛けて、ゲームプレイに合わせます。
インパクトの点で埃のパーティクルと効果音の再生をトリガーするためにもタップメソッドを使用します。パーティクルと音声についてはその5で説明します。
まとめ
ボールスクリプトは、重力下でのボールの落下や、タップへの反応を可能にするため、単純な物理シミュレーションを実行します。また、ゲームイベントにリッスンして、一時停止やリセットを行います。最後に、他のシステムと相互作用してパーティクルエフェクトの表示や音声の再生を行います。