Google H5広告ベータ版の収益化
このチュートリアルのリンク
イントロダクション
このチュートリアルでは、Google H5 Games Ads Beta の広告をゲームに統合して収益化する方法をご紹介します。
広告は主に次の2つの形式があります。
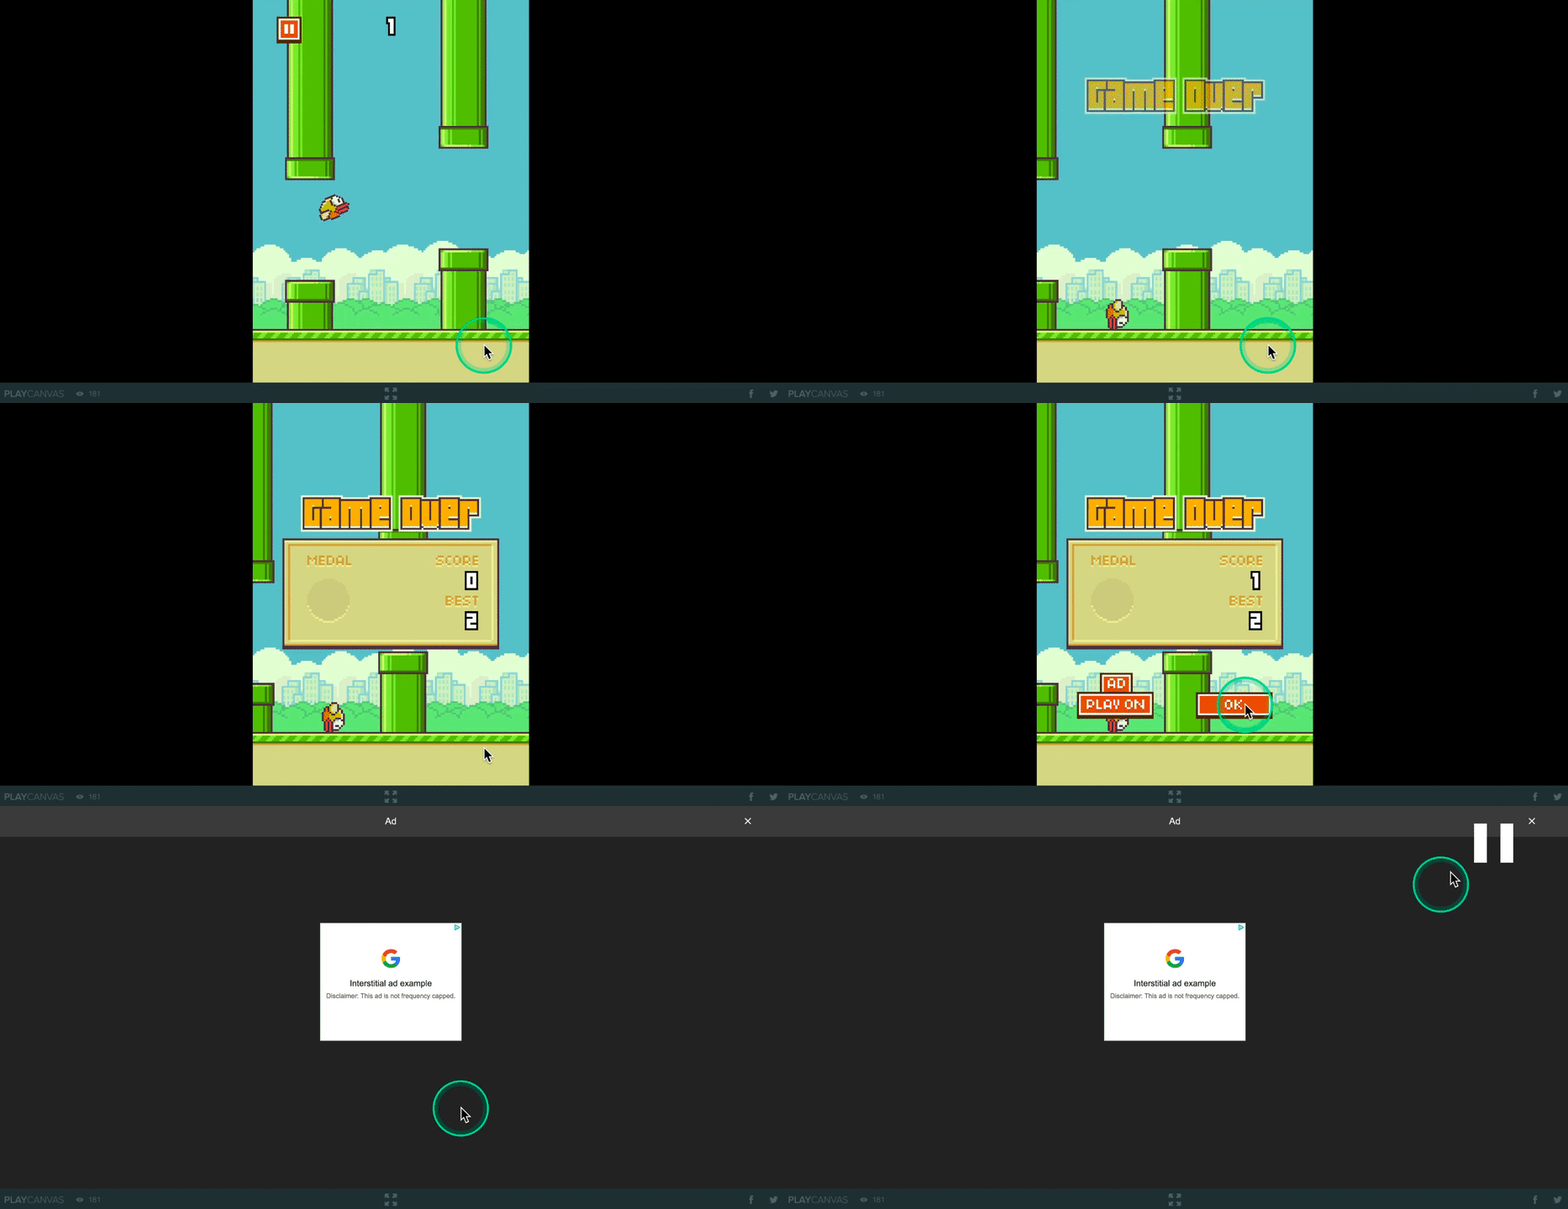
インタースティシャル広告は、プレイのセッション間(例えば 'ゲームオーバー' からメインメニューに戻るなど)に表示される広告です。テレビ番組のコマーシャルブレイクのようなものです。
Flappy Bird の例では、プレイヤーが死んでメインメニューに戻って再度プレイするときに広告が表示されます。
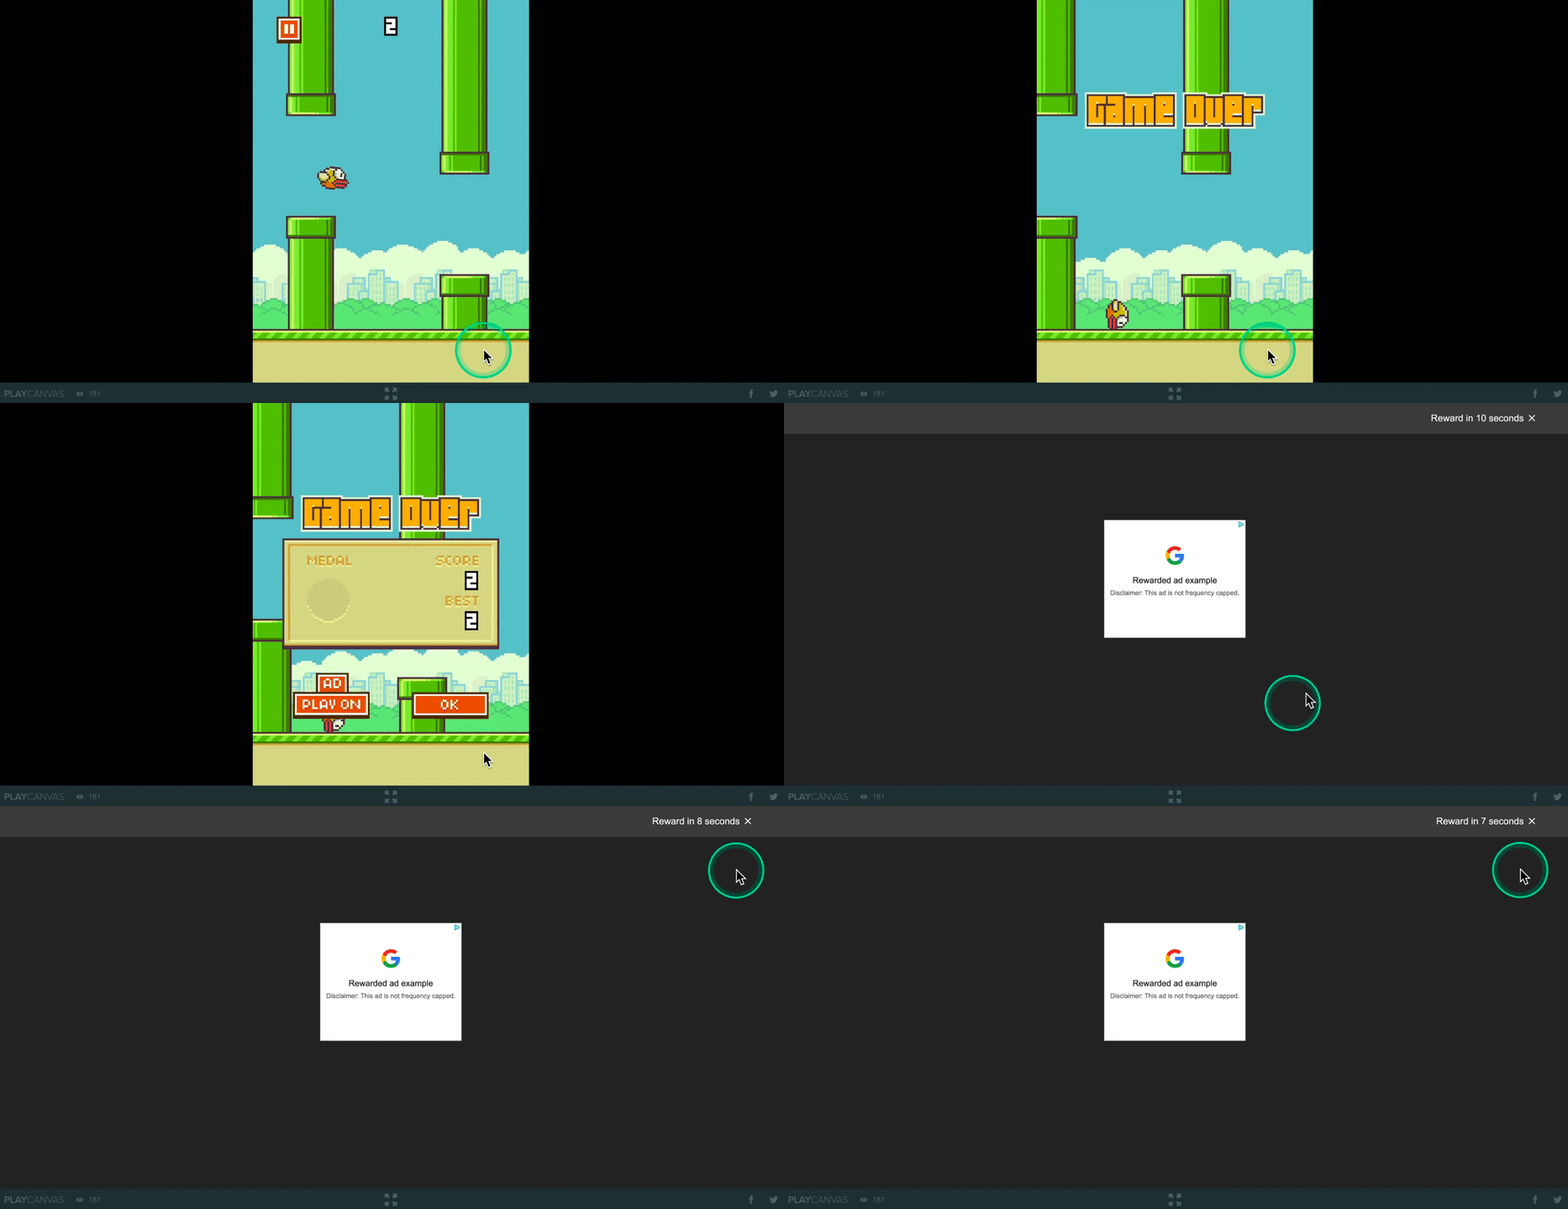
もう一つの形式は、リワード広告で、プレイヤーがコインや続けてプレイすることができる 'リワード' を得るために広告を視聴することができます。これらは、プレイヤーに広告を見るかどうかの選択肢を与え、試合中にすぐに報酬を得ることができるため、効果的とされています。
例では、倒れた後に続けてプレイできるようにするために、リワード広告を使用しています。これは、ユーザーに広告を見るインセンティブを提供する強力な方法です。
チュートリアルでは、Google H5 Ad Tutorial (Start)プロジェクトをフォークして、少しずつ広告SDKライブラリと機能を追加していきます。
最終的には、以下のようになり、ボタンのクリックでインタースティシャル広告とリワード広告を呼び出し、リフレッシュボタンでリワード広告が表示されるかどうかを確認できます(後述)。
設定
Google H5 Games Adsを使用するには、Google Adsenseアカウントを作成して、広告統合用のPublisher IDを取得する必要があります。
また、Google H5 Games Ads のポリシーを確認し、こちらからベータ版にサインアップする必要があります。
Google H5 Ad Tutorial (Start)プロジェクトのダッシュボードページに移動し、「フォーク」をクリックして、プロジェクトを確認してみましょう。
これは、ui-controller.jsスクリプトに広告を表示するためのボタンクリックコールバックを追加する準備が整ったシンプルなプロジェクトです。
// ...
// initialize code called once per entity
UiController.prototype.initialize = function() {
    this.rewardedGivenPanelEntity.enabled = false;
    this.rewardedAdButtonEntity.button.active = false;

    var onRefresh = function () {

    }.bind(this);

    this.refreshButtonEntity.button.on('click', function (e) {
        onRefresh();
    }, this);

    this.interstitialAdButtonEntity.button.on('click', function(e) {

    }, this);

    this.rewardedAdButtonEntity.button.on('click', function (e) {

    }, this);

    this.okRewardButtonEntity.button.on('click', function (e) {
        this.rewardedGivenPanelEntity.enabled = false;
    }, this);
};
まず、Google SDKの統合ファイルを追加していきます。これは、Flappy Birdプロジェクトから「Google H5 Games Ads」フォルダをコピーして、チュートリアルプロジェクトのフォークに貼り付けることで行います。
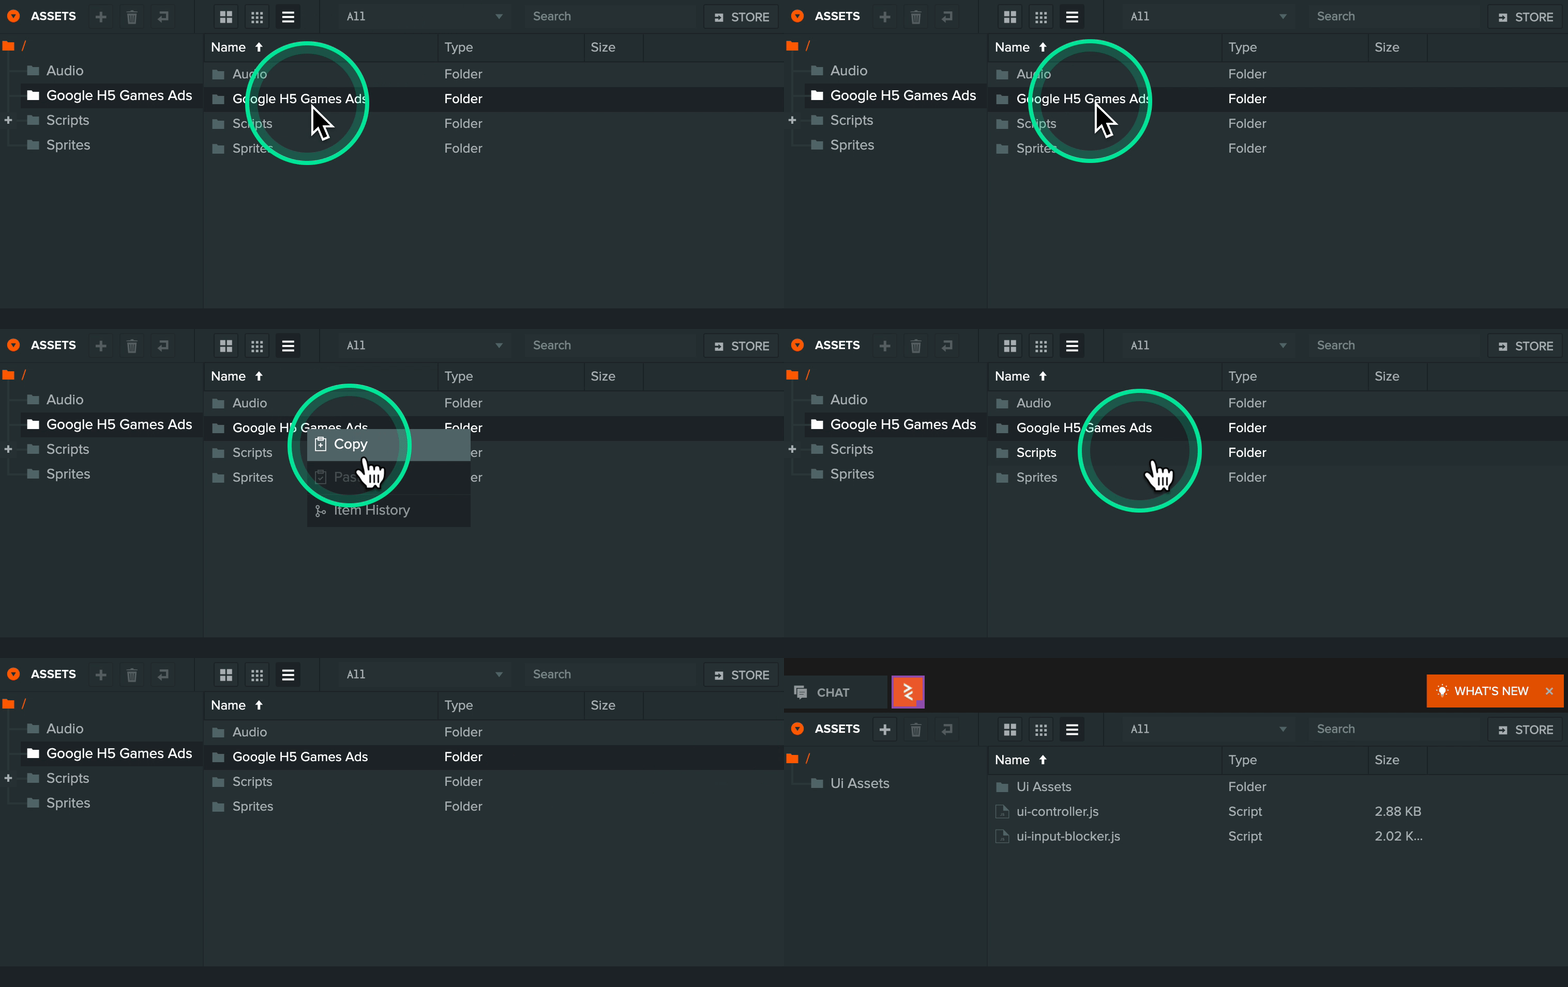
そして、フォークされたチュートリアルプロジェクトに貼り付けます。
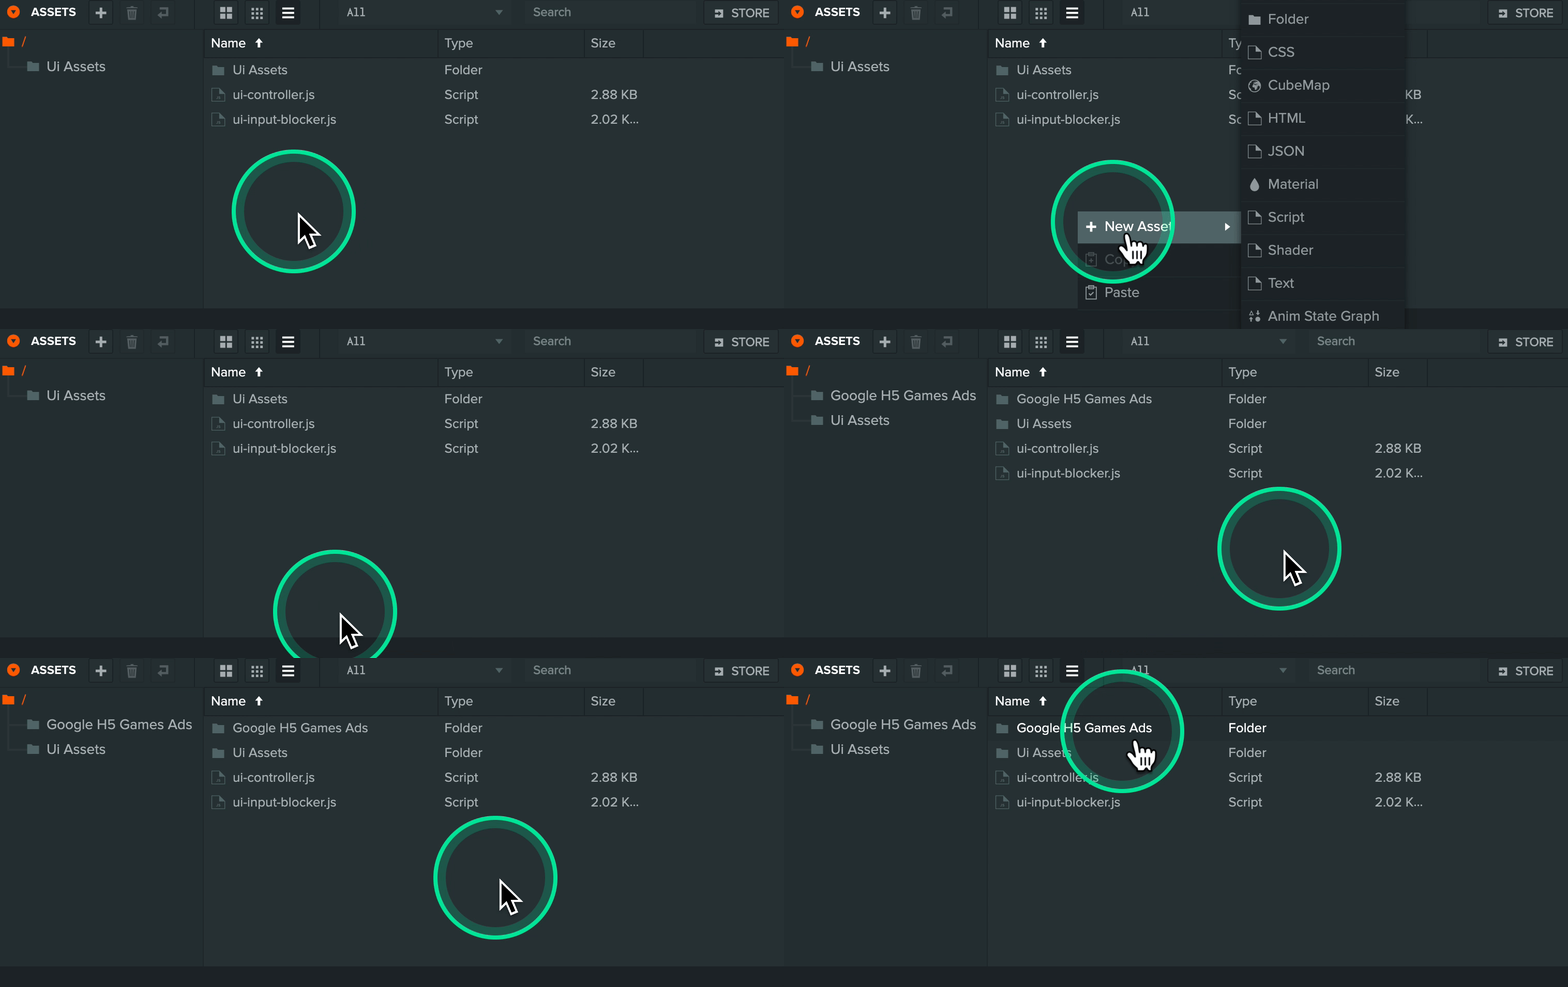
中身を見てみましょう。
afg-integration.jsは、GoogleのSDKをページに追加し、ユーザーに広告が配信される間隔を設定します。この間隔は必要に応じて変更できます。チュートリアルでは、実際の広告ではなくプレースホルダーを表示するためにテストモードを有効にしています。
ca-pub-XXXXXXXXXを、Google Adsenseから取得したPublisher IDに置き換える必要があります。
// https://developers.google.com/ad-placement/docs/example
(function() {
    var script = document.createElement('script');
    script.setAttribute('crossorigin', 'anonymous');

    // Comment out to disable test mode
    script.setAttribute('data-adbreak-test', 'on');

    // Ad frequency is user configuble
    // https://developers.google.com/ad-placement/docs/ad-rate
    script.setAttribute('data-ad-frequency-hint', '30s');

    // Comment in if you would like to use a specific channel for ad reporting
    // https://developers.google.com/ad-placement/docs/advanced-reporting
    // script.setAttribute('data-ad-channel', 'XXXXXX');

    script.src = 'https://pagead2.googlesyndication.com/pagead/js/adsbygoogle.js?client=ca-pub-XXXXXXXXX';
    document.head.appendChild(script);
})();
afg-setup.jsは、広告の取り扱いを少し簡単にするためのラッパーです。GoogleのSDKを設定し、広告が表示される前にゲームを一時停止し、その後に再開するためのヘルパー関数を追加します。
これには以下が含まれます。
- 入力の無効化/有効化
- サウンドのミュート/ミュート解除
- タイムスケールの設定/リセット
- レンダリングの無効化/有効化
(function () {
    var app = pc.Application.getApplication();

    window.adsbygoogle = window.adsbygoogle || [];
    var afg = {};

    afg.adBreak = window.adConfig = function (o) { adsbygoogle.push(o); };
    afg.ready = false;

    var onReady = function () {
        afg.ready = true;
    };

    // Config the ad setup
    adConfig({
        // https://developers.google.com/ad-placement/docs/preload-ads
        preloadAdBreaks: 'on',
        // https://developers.google.com/ad-placement/docs/manual-sequence
        onReady: onReady,
    });

    // Create help functions to disable input and sound
    var _mouseTargetElement = null;
    var _keyboardTargetElement = null;
    var _touchTargetElement = null;
    var _beforeAdVolume = null;
    var _beforeAdTimeScale = null;
    var _beforeAutoRender = null;

    var beforeAdCalled = false;

    afg.onBeforeAd = function () {
        // Currently using private API for this. May need to be updated
        // if PlayCanvas engine is updated
        _mouseTargetElement = app.mouse._target;
        _keyboardTargetElement = app.keyboard._element;

        if (app.touch) {
            _touchTargetElement = app.touch._element;
        }

        _beforeAdVolume = app.systems.sound.volume;
        _beforeAdTimeScale = app.timeScale;
        _beforeAutoRender = app.autoRender;

        app.systems.sound.volume = 0;
        app.timeScale = 0;
        app.autoRender = false;

        beforeAdCalled = true;
    };

    afg.onAfterAd = function () {
        // Protect against assigning a null element in case this is called
        // without onBeforeAd being called
        if (beforeAdCalled) {
            app.mouse.attach(_mouseTargetElement);
            app.keyboard.attach(_keyboardTargetElement);

            if (app.touch) {
                app.touch.attach(_touchTargetElement);
            }

            app.systems.sound.volume = _beforeAdVolume;
            app.timeScale = _beforeAdTimeScale;
            app.autoRender = _beforeAutoRender;
        }

        beforeAdCalled = false;
    };

    window.afg = afg;
})();
インタースティシャル広告の追加
まず、プロジェクトにインタースティシャル広告を追加してみましょう。
ui-controller.jsのインタースティシャル広告ボタンクリックイベントコールバックに以下のコードを追加してください。
// ...
this.interstitialAdButtonEntity.button.on('click', function(e) {
    if (afg.ready) {
        afg.adBreak({
            type: 'start',
            name: 'test-interstitial',
            beforeAd: function() { afg.onBeforeAd(); }.bind(this),
            adBreakDone: function() { afg.onAfterAd(); onRefresh(); }.bind(this)
        });
    }
}, this);
// ...
ここでは、まずGoogle SDKが準備ができているかどうかを確認し、adBreakを呼び出します。これはGoogle SDK自体が公開している関数です。詳細なドキュメントとオプションは彼らのサイトで見つけることができます。例として、以下を使用します。
- Google SDKドキュメントからこれらのタイプの1つである
type - 報告用にH5 Games Adsで任意の名前を使用できる
name - 広告が表示される前にコードを実行するためのコールバック
beforeAd - 広告が表示された後に呼び出されるコールバック(何らかの理由で広告が表示されなかった場合でも)
adBreakDone
前述のように、コールバックでヘルパー関数onBeforeAdとonAfterAdを使用して、広告の前にゲームを「一時停止」し、その後に「再開」する共通のエリアを処理します。独自のゲームに特定のエリアがある場合は、ここでそれらを処理するためのカスタムロジックを追加することができます。
さあ、実際に見てみましょう!
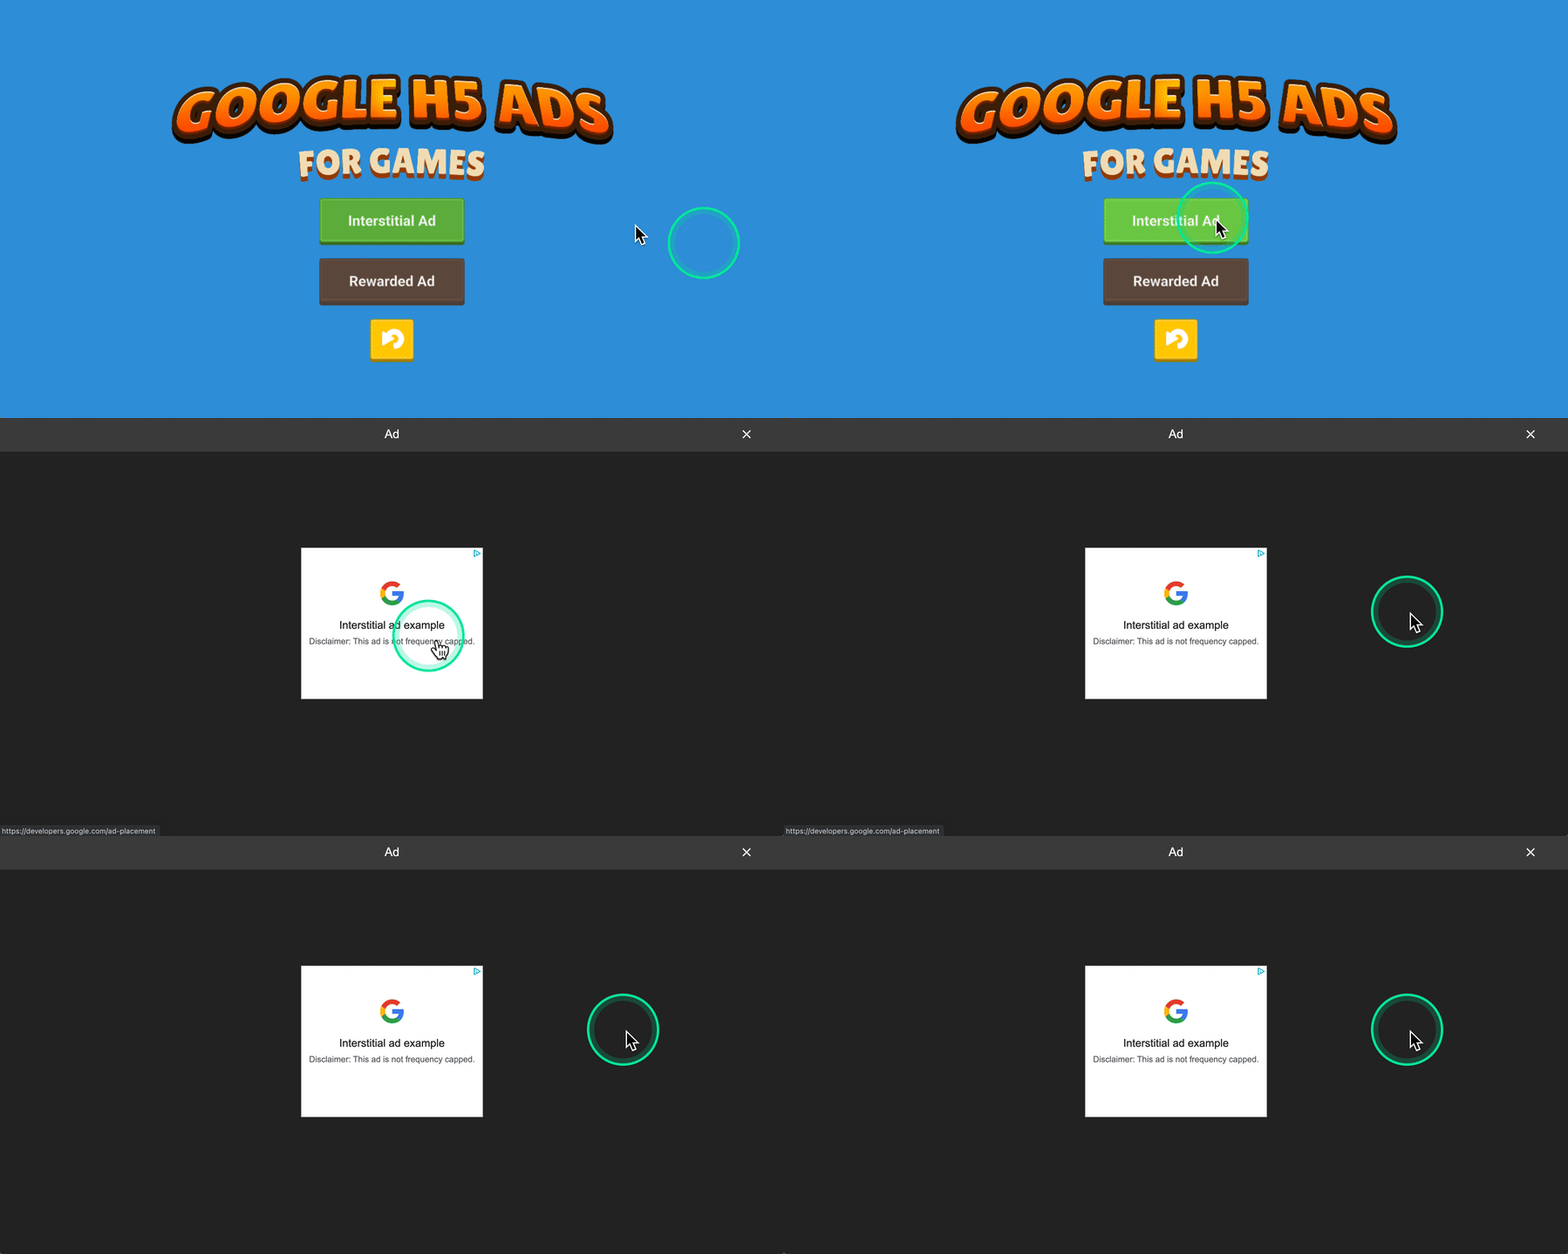
ゲームでインタースティシャル広告を表示することを意図している場合は、常にadBreakを呼び出すことが目的です。これには、afg-integration.jsで先に設定した広告の頻度ヒントを含む、Google SDKが広告自体を表示する際のロジックが含まれています。
報酬広告の追加
ただし、報酬広告の場合は、プロセスが少し異なります。高レベルのロジックフローは次のとおりです。
- 報酬広告が利用可能かどうかを確認するために
adBreakを呼び出します - 利用可能であれば、広告を表示する関数が与えられます
- プレイヤーに報酬と引き換えに広告を見るためのボタンを表示します
- ボタンが押されると、SDKから与えられた関数を呼び出して広告を表示します
Flappy Birdの例で、プレイヤーが広告を見て倒れた後に続けてプレイできるようにする方法を見てみましょう。
// ...
app.on('game:gameover', function () {
    app.root.findByName('Game Screen').enabled = false;
    app.root.findByName('Game Over Screen').enabled = true;

    app.fire('pipes:stop');
    app.fire('ground:stop');
    app.fire('ui:fadeingameover');
    app.fire('ui:showscoreboard', this.score, this.bestScore);

    // Check if we have a new high score and write it to local storage
    if (this.score > this.bestScore) {
        this.bestScore = this.score;
        if (storageAvailable('localStorage')) {
            localStorage.setItem('Flappy Bird Best Score', this.score.toString());
        }
    }

    this.showAdButtonContainerEntity.enabled = false;

    // Call rewarded ad adBreak() to see if we can actually play an ad
    if (afg.ready) {
        afg.adBreak({
            type: 'reward',
            name: 'play-on',
            beforeReward: function(showAdFn) {
                this.showAdFn = showAdFn;
                this.showAdButtonContainerEntity.enabled = true;
            }.bind(this),
            adViewed: function() {
                afg.onAfterAd();
                app.fire('game:getready', this.score);
            }.bind(this),
            adDismissed: function() {
                afg.onAfterAd();
                app.fire('game:menu', true);
            }.bind(this),
            adBreakDone: function(placementInfo) { }.bind(this)
        });
    }

    setTimeout(function () {
        app.fire('game:audio', 'Swoosh');
    }, 500);
}, this);
// ...
ゲームオーバーイベントが呼び出されたとき、タイプrewardでadBreakを呼び出し、beforeReward、adViewed、およびadDismissedのコールバックを持っています。
beforeRewardは、広告が利用可能であれば広告を表示するために渡される関数を伝えます。また、広告を視聴するためのボタンを表示します。
adViewedは、広告が終了した後にSDKによって呼び出されるため、ゲームがプレーヤーに報酬を与えることができるようになります。この場合、スコアを0にリセットせずにゲームを再開します。
adDismissedは、広告が完了する前にプレーヤーによって停止された場合にSDKによって呼び出されます。この場合、報酬は与えられず、メインメニューに戻ります。
それでは、プロジェクトに追加してみましょう。
報酬付き広告が表示可能かどうかは、リフレッシュボタンを使用して確認します。プレーヤーがボタンを押すと、次のコードをonRefresh関数に追加します。
// ...
var onRefresh = function () {
    this.rewardedAdButtonEntity.button.active = false;

    // Check if rewarded ad is available to view
    if (afg.ready) {
        afg.adBreak({
            type: 'reward',
            name: 'test-reward',
            beforeReward: function(showAdFn) {
                this._showRewardAdFn = showAdFn;
                this.rewardedAdButtonEntity.button.active = true;
            }.bind(this),
            adViewed: function() {
                afg.onAfterAd();
                this.rewardedGivenPanelEntity.enabled = true;
                this.rewardedAdButtonEntity.button.active = false;
                this._showRewardAdFn = null;
            }.bind(this),
            adDismissed: function() {
                afg.onAfterAd();
                this.rewardedAdButtonEntity.button.active = false;
                this._showRewardAdFn = null;
            }.bind(this),
            adBreakDone: function(placementInfo) { }.bind(this)
        });
    }
}.bind(this);
// ...
リフレッシュボタンが押されると、報酬ボタンエンティティが無効になり、プレイヤーに表示されないようにします。
beforeRewardコールバックでは、広告を表示する関数への参照を保持し、報酬ボタンが表示できることを確認します。
adViewedコールバックでは、プレーヤーに報酬を更新してゲームを再開するために、ヘルパー関数onAfterAdを呼び出します。
adDismissedコールバックでは、報酬が与えられないため、報酬ボタンエンティティが無効になっていることを確認します。
adBreakDoneには、コールバックを指定する必要がありますが、この場合はデモでは使用していないため、emptyになっています。しかし、placementInfoオブジェクトには、エラーメッセージなどの広告に関する情報が含まれており、デバッグに便利です。
次に、報酬広告ボタンが押されたときに広告を表示する必要があります。ボタンのクリックイベントのコールバックに、次のコードを追加します。
// ...
this.rewardedAdButtonEntity.button.on('click', function (e) {
    if (this._showRewardAdFn) {
        afg.onBeforeAd();
        this._showRewardAdFn();
    }
}, this);
// ...
まず、SDKから広告を最初に表示する機能があるか確認し、ある場合は、ヘルパー関数 onBeforeAd() を使用してゲームを一時停止し、広告を表示する機能を呼び出します。
これを動作中に見てみましょう。
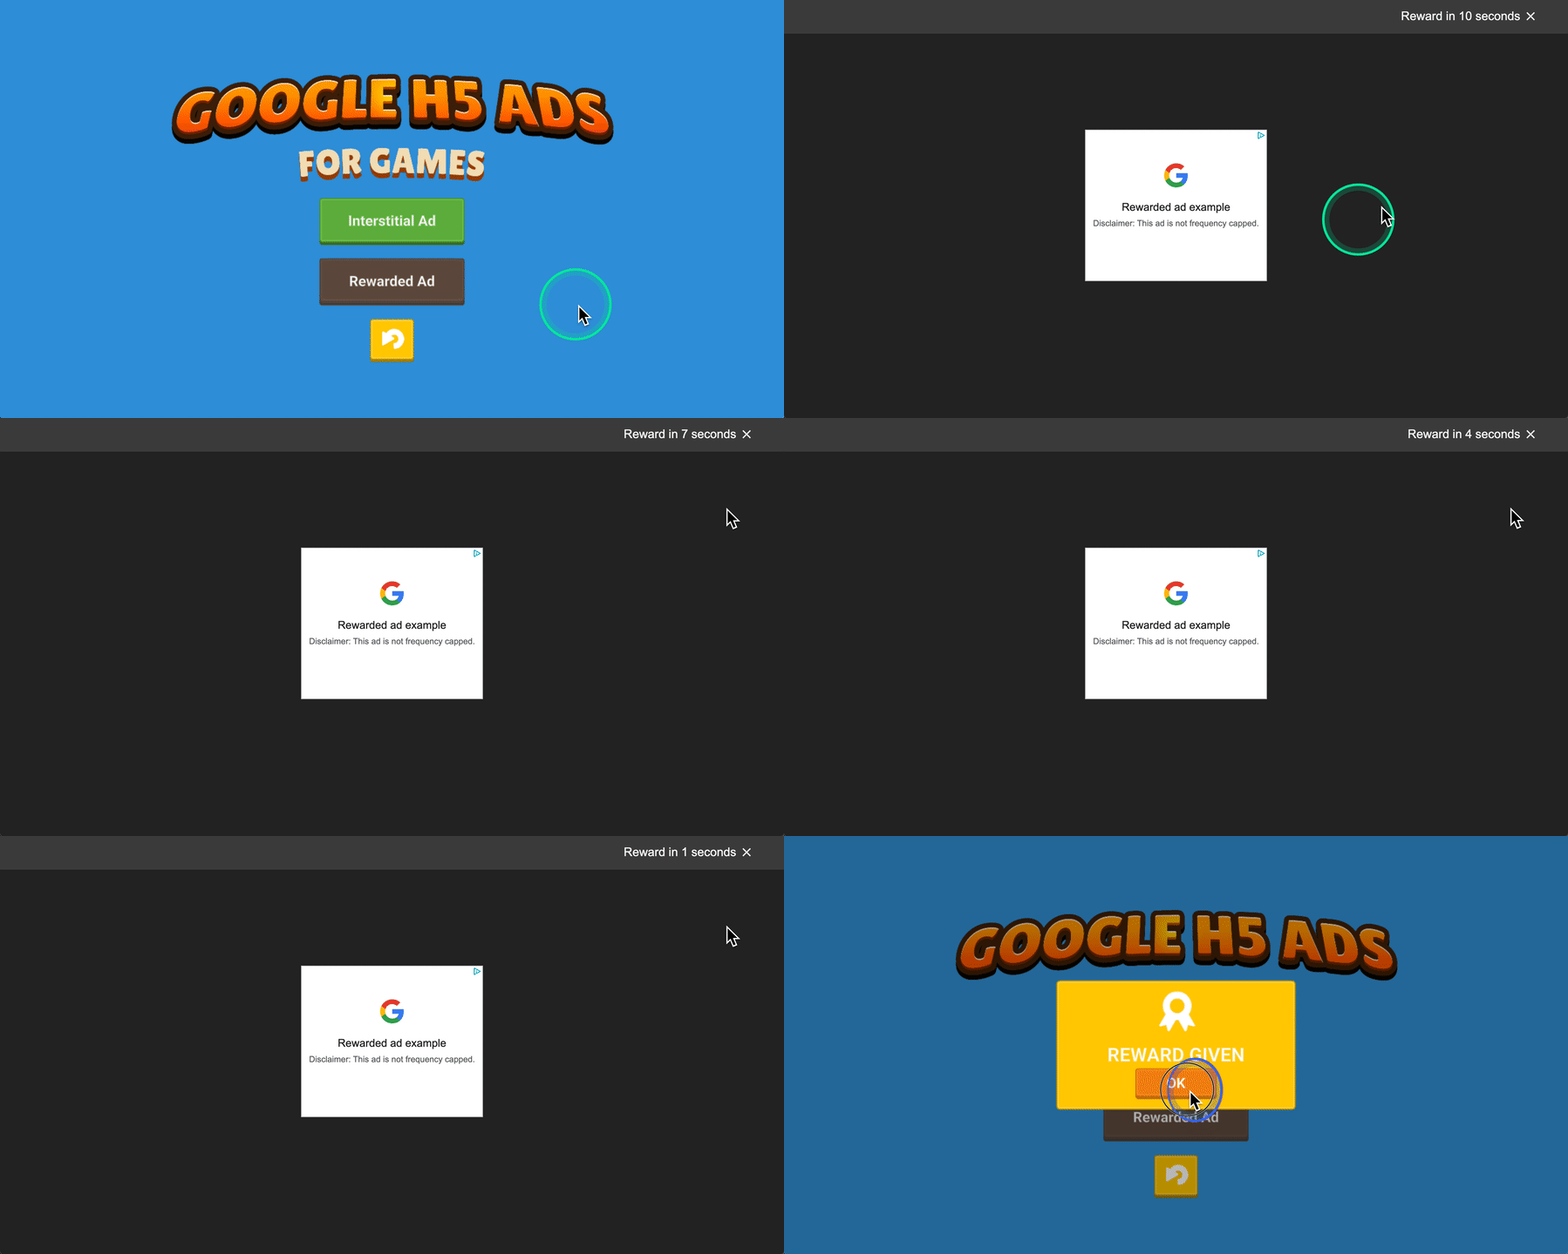
完了した ui-controller.js ファイルは次のようになるはずです。
var UiController = pc.createScript('uiController');
UiController.attributes.add('refreshButtonEntity', {type: 'entity', title: 'Refresh Button Entity'});
UiController.attributes.add('interstitialAdButtonEntity', {type: 'entity', title: 'Interstitial Ad Button Entity'});
UiController.attributes.add('rewardedAdButtonEntity', {type: 'entity', title: 'Rewarded Ad Button Entity'});
UiController.attributes.add('okRewardButtonEntity', {type: 'entity', title: 'OK Rewarded Button Entity'});
UiController.attributes.add('rewardedGivenPanelEntity', {type: 'entity', title: 'Rewarded Given Entity'});


// initialize code called once per entity
UiController.prototype.initialize = function() {
    this._showRewardAdFn = null;

    this.rewardedGivenPanelEntity.enabled = false;
    this.rewardedAdButtonEntity.button.active = false;

    var onRefresh = function () {
        this.rewardedAdButtonEntity.button.active = false;

        // Check if rewarded ad is available to view
        if (afg.ready) {
            afg.adBreak({
                type: 'reward',
                name: 'test-reward',
                beforeReward: function(showAdFn) {
                    this._showRewardAdFn = showAdFn;
                    this.rewardedAdButtonEntity.button.active = true;
                }.bind(this),
                adViewed: function() {
                    afg.onAfterAd();
                    this.rewardedGivenPanelEntity.enabled = true;
                    this.rewardedAdButtonEntity.button.active = false;
                    this._showRewardAdFn = null;
                }.bind(this),
                adDismissed: function() {
                    afg.onAfterAd();
                    this.rewardedAdButtonEntity.button.active = false;
                    this._showRewardAdFn = null;
                }.bind(this),
                adBreakDone: function(placementInfo) { }.bind(this)
            });
        }
    }.bind(this);

    this.refreshButtonEntity.button.on('click', function (e) {
        onRefresh();
    }, this);

    this.interstitialAdButtonEntity.button.on('click', function(e) {
        if (afg.ready) {
            afg.adBreak({
                type: 'start',
                name: 'test-interstitial',
                beforeAd: function() { afg.onBeforeAd(); }.bind(this),
                adBreakDone: function() { afg.onAfterAd(); onRefresh(); }.bind(this)
            });
        }
    }, this);

    this.rewardedAdButtonEntity.button.on('click', function (e) {
        if (this._showRewardAdFn) {
            afg.onBeforeAd();
            this._showRewardAdFn();
        }
    }, this);

    this.okRewardButtonEntity.button.on('click', function (e) {
        this.rewardedGivenPanelEntity.enabled = false;
    }, this);
};
まとめ
以上が、H5ゲームやアプリケーションのGoogleのH5 Games Adsの統合の基本になります!
完成したプロジェクトはこちらで、GoogleのH5 Games Ads SDKとAPIの詳細情報はこちらのサイトで入手できます。
重要:チュートリアルではテストモードを使用していたため、実際の広告は表示されませんでした。製品用にテストモードを無効にするときは、リリースする国のプライバシー/クッキーポリシー、GDPRを含めて準拠していることを確認してください。通常、これは何らかの形でのクッキー同意の実装を意味します。