Making a Simple Game - Part 1
You can find the full project here
In this series of tutorials we're going to show you how a complete game is made using PlayCanvas. We've made a simple "Keepy Up" game where the object is to click or tap on the soccer ball to keep it in the air.
We'll cover these topics:
- The Scene and Hierarchy
- Material Setup
- The Game Script
- Ball Physics and Input
- Audio & Effects
- User Interface
This isn't a step-by-step guide, but we will talk about all areas of the scripts and try and explain how each bit works. We recommend you fork the Game project into your own account and follow along as we go through.
Part 1: The Scene and Hierarchy
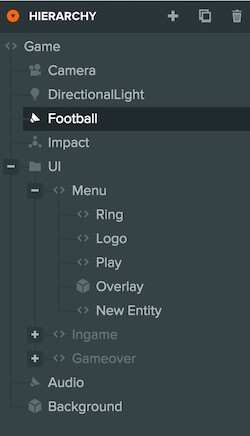
In PlayCanvas your scene is described by a hierarchy of Entities. Each Entity is a "thing" in your application, it will always consist of an ID, a name and a transform. A transform is a matrix which defines the position, rotation and scale of the Entity in 3D space. To build your scene you create Entities and arrange them in a tree structure which is displayed on the left panel of the editor. The tree structure allows parent Entities to affect their children, for example, all child Entities inherit their parents position, rotation and scale. Also, if you disable a parent Entity all child Entities will also be disabled.
In our Keepy Up scene we have 7 top level Entities in the hierarchy.

Camera Entity
A Camera is where your scene is viewed from while the application is running. In this game we only have one camera and it is stationary.
Directional Light Entity
Lights illuminate 3D models in the scene. The more lights you have active at once, the longer it will take to render a scene and this can effect the frame rate of your game. You should aim to have only a few lights active at once. In this game we have a single stationary Directional Light.
Football Entity
The football is the main dynamic Entity in the scene. The Football Entity has 3 components attached to it. You can see the components by selecting the Football and viewing the Attribute Panel on the right side of the editor. The 3 components are:
Sound Component
The sound component lets you play back sound files. Each Sound component has a number of slots, one for each sound file. You can choose playback settings like, whether the sound will loop, the volume or the pitch. The football has a single slot for the sound made when the ball bounces.
Model Component
The model component is used to attach a 3D model asset to an Entity. When you have an enabled model component on an Entity the 3D model will be rendered at the Entity's position in the 3D space. In this case, we have attached the football model.
Script Component
The script component lets you attach javascript files to an Entity. Each entity will create an instance of the script inside the javascript file so that you can customize the behavior of the Entity. We'll go into more detail about the script on the football in Part 3.
Background
The Background Entity has another model component. This time it is the back plane that forms the background to the game. The background is created using a texture of a stadium in a material asset applied to the built in Plane Entity type. We're using the Emissive slot on the material to make sure the background is bright and is not shadowed by the light and the football. This effect is a bit like a matte painting used in an old film.
Impact Effect Entity
The Impact Effect Entity is a particle effect that plays when the ball is bounced. We'll go into more detail in Part 4.
Audio
The Audio Entity has more sound components attached to it. This Entity is for playing the music and the game over sound.
UI (User Interface)
The UI Entity is the parent of several other Entities, one for each screen that is used for the user interface of the game. We'll cover the UI Entity in Part 5.
Part 2 covers the main game script.