Animation Blending
This tutorial uses the deprecated Model and Animation components. Please refer to the Anim State Graph Blending tutorial instead.
Click on screen to focus, then press the 'p' key to blend to a punch animation.
This tutorial illustrates the basics of animation blending.
Objects in your scene may be animated; machines or characters are good examples of things that you might want to animate. Generally, when 3D content is created, individual animations are authored and these animations are typically referred to as cycles (because they loop). For example, a human character could have an idle cycle, a walk cycle, a run cycle and so on. As a PlayCanvas developer, you'll want a mechanism to play these animations back on your animated object. Additionally, you do not want these animations to 'pop' as one is switched for another. To remedy this, you should use animation blending which implements a smooth transition from one animation to another. This dramatically improves the visual fidelity of your animated object.
Let's examine how this is achieved via PlayCanvas...
The Animation Component
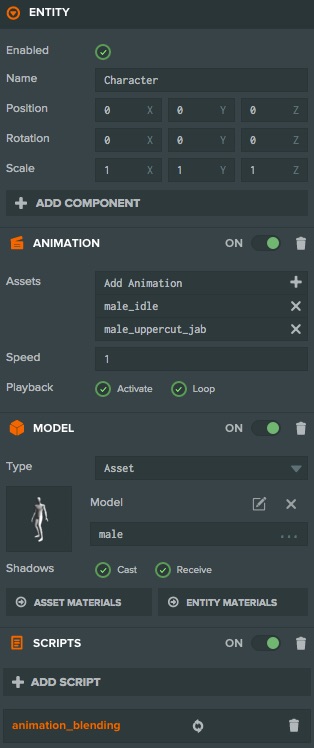
In order to apply an animation to a model, you add the animation component to your entity. Below is the configuration of the skinned character as displayed in PlayCanvas Editor.

In the image you can see the animation component in the Inspector. There are 2 animation assets assigned: an 'idle' cycle and a 'punch' cycle. With the animation component configured this way, the behavior is that the first animation (the idle cycle) is played and because the looping option is set, it will continue to animate ad infinitum. However, we would like to achieve something a little more interesting:
- Play a looping idle animation.
- Blend to a looping punch animation on a key press.
- Blend back to idle on key release.
So this kind of functionality goes beyond the abilities of the humble animation component. A script component is required to cook up this additional behavior. You can see the script component in the above screenshot of the skinned character entity in Editor and it refers to a JS file called animation_blending.js. The contents of this file is:
- ESM
- Classic
import { Script, KEY_P } from 'playcanvas';

export class AnimationBlending extends Script {
    static scriptName = 'animationBlending';

    static states = {
        idle: {
            animation: 'male.json'
        },
        punch: {
            animation: 'male_uppercut_jab.json'
        }
    }

    // initialize code called once per entity
    initialize() {
        this.blendTime = 0.2;

        this.setState('idle');
    };

    update(dt) {
        if (this.app.keyboard.wasPressed(KEY_P)) {
            this.setState('punch');
        }

        if (this.app.keyboard.wasReleased(KEY_P)) {
            this.setState('idle');
        }
    };

    setState(state) {
        const states = AnimationBlending.states;

        this.state = state;
        // Set the current animation, taking 0.2 seconds to blend from
        // the current animation state to the start of the target animation.
        this.entity.animation.play(states[state].animation, this.blendTime);
    };
}
var AnimationBlending = pc.createScript('animationBlending');

AnimationBlending.states = {
    idle: {
        animation: 'male.json'
    },
    punch: {
        animation: 'male_uppercut_jab.json'
    }
};

// initialize code called once per entity
AnimationBlending.prototype.initialize = function() {
    this.blendTime = 0.2;

    this.setState('idle');
};

AnimationBlending.prototype.update = function(dt) {
    if (this.app.keyboard.wasPressed(pc.KEY_P)) {
        this.setState('punch');
    }

    if (this.app.keyboard.wasReleased(pc.KEY_P)) {
        this.setState('idle');
    }
};

AnimationBlending.prototype.setState = function (state) {
    var states = AnimationBlending.states;

    this.state = state;
    // Set the current animation, taking 0.2 seconds to blend from
    // the current animation state to the start of the target animation.
    this.entity.animation.play(states[state].animation, this.blendTime);
};
From this point, you are able to add more and more animations to the animation component and start scripting much more complex animation state charts.