Input
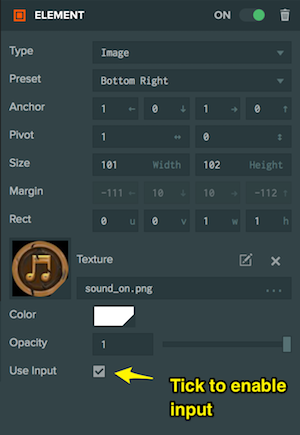
The user can interact with Element components, by enabling the useInput field on the Element component:

Also in order for that to work there must be an initialized instance of pc.ElementInput for pc.Application#elementInput. This is created automatically for you if you are using the Editor. If you are using the Engine only make sure to create an instance before the other input devices like pc.Mouse or pc.TouchDevice like so:
const app = new pc.Application(canvas, {
    elementInput: new pc.ElementInput(canvas),
    mouse: new pc.Mouse(canvas),
    touch: !!('ontouchstart' in window) ? new pc.TouchDevice(canvas) : null,
    keyboard: new pc.Keyboard(window),
    gamepads: new pc.GamePads(),
    ...
});
Input Events
When you enable input on an Element component the following events will be fired:
mousedown
Fired when the mouse is pressed while the mouse cursor is on the component.
mouseup
Fired when the mouse is released while the mouse cursor is on the component.
mouseenter
Fired when the mouse cursor enters the component.
mouseleave
Fired when the mouse cursor leaves the component.
mousemove
Fired when the mouse cursor is moved on the component.
mousewheel
Fired when the mouse wheel is scrolled on the component.
click
Fired when the mouse is pressed and released on the component or when a touch starts and ends on the component.
touchstart
Fired when a touch starts on the component.
touchend
Fired when a touch ends on the component.
touchmove
Fired when a touch moves after it started touching the component.
touchcancel
Fired when a touch is cancelled on the component.
Event Handling
To handle an input event you can listen for it on the Element component:
this.entity.element.on('click', function (event) {
    console.log('The element ' + event.element.entity.name + ' was clicked.');
}, this);
Event bubbling
When an input event is fired on an Element component it bubbles up to its parent Elements unless you call event.stopPropagation(). For example:
this.entity.element.on('click', function (event) {
    // stop bubbling
    event.stopPropagation();

    console.log('The element ' + event.element.entity.name + ' was clicked.');
}, this);
Calling stopPropagation will also stop the event from being handled by the other input devices like pc.Mouse or pc.TouchDevice. So if for example you are handling mouse input using app.mouse.wasPressed, you can call stopPropagation on the mousedown event to prevent app.mouse.wasPressed from returning true. For example:
- ESM
- Classic
import { Script, MOUSEBUTTON_LEFT } from 'playcanvas';

export class InputScript extends Script {
    static scriptName = "inputScript";

    initialize() {
        this.entity.element.on('mousedown', (evt) => {
            evt.stopPropagation();
        }, this);
    }

    update(dt) {
        if (this.app.mouse.wasPressed(MOUSEBUTTON_LEFT)) {
            // do something when the left button was pressed.
            // this will not be called if the button was pressed on the Element
            // because we call stopPropagation
        }
    }
}
var InputScript = pc.createScript('inputScript');

InputScript.prototype.initialize = function () {
    this.entity.element.on('mousedown', function (evt) {
        evt.stopPropagation();
    }, this);
},

InputScript.prototype.update = function (dt) {
    if (this.app.mouse.wasPressed(pc.MOUSEBUTTON_LEFT)) {
        // do something when the left button was pressed.
        // this will not be called if the button was pressed on the Element
        // because we call stopPropagation
    }
}
Mouse and Touch event conflict on Google Chrome
Google Chrome simulates mouse events also on touch devices. By doing so it could cause some unexpected behavior. For example if you hide a button right after the click event, another UI element that lays behind it could also receive an unwanted click event.
To prevent this behavior you can call the preventDefault() method of the native event object on the pc.EVENT_TOUCHEND event:
Here is small script to include once in your scene:
- ESM
- Classic
import { Script, EVENT_TOUCHEND } from 'playcanvas';

export class TouchFix extends Script {
    static scriptname = "touchFix";

    initialize () {
        // Only register touch events if the device supports touch
        const touch = this.app.touch;
        if (touch) {
            touch.on(EVENT_TOUCHEND, function(event) {
                // This prevents that a mouse click event will be executed after a touch event.
                event.event.preventDefault();
            });
        }
    }
}
var TouchFix = pc.createScript('touchFix');

// initialize code called once per entity
TouchFix.prototype.initialize = function() {
    // Only register touch events if the device supports touch
    const touch = this.app.touch;
    if (touch) {
        touch.on(pc.EVENT_TOUCHEND, function(event) {
            // This prevents that a mouse click event will be executed after a touch event.
            event.event.preventDefault();
        });
    }
};