Sprite Editor
The Sprite Editor is used to edit both Texture Atlas assets and Sprite assets. It is also used to create Sprite Assets.
To open the Sprite Editor, double-click on any Texture Atlas or Sprite asset in the Editor asset panel.
![]()
Viewport

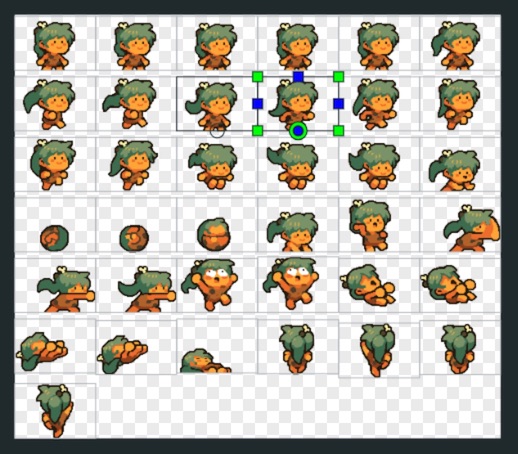
The viewport in the Sprite Editor shows the currently selected Texture Atlas. Frames are shown as grey boxes on the texture atlas. The currently selected asset is shown with two sets of handles. green and blue. Green handles modify the frame's width and height, blue handles modify the frame's border property.
Editing Texture Atlases
Within the viewport use the mouse to drag the outline of a Frame, then use the green and blue handles to modify the frames extents and borders.
Frames
Frames are a defined region on a Texture Atlas. A frame has a name, a position and size and a border. The border is used to define the edges of the 9-slicing region. See the 9-slicing documentation for more information.
Inspector
The inspector panel shows the properties of the currently selected item. The inspector changes depending on whether the selected item is a Texture Atlas, Frame or Sprite Asset.
Texture Atlas Inspector

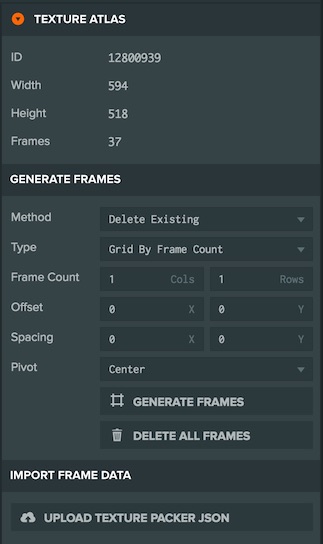
The Texture Atlas Inspector allows you to automatically slice a texture atlas into a fixed grid.
First choose what to do with existing frames. You can choose to Delete Existing frames or do not delete and Only Append frames.
Then select the method of specifying the grid cells
- Grid By Frame Count - Specify the number of grid cells horizontally and vertically to divide the texture into
- Grid By Frame Size - Specify the size in pixels that each grid cell should be
Then set the values for Offset and Spacing. Offset is the number of pixels to move in from the top left of the texture before starting the grid. Spacing is the number of pixels between each grid cell.
Finally set the pivot for all newly generated frames, the pivot determines the position and rotation point of the sprite. It is specified as a proportion of the width and height.
Once all your settings are chosen, click the Generate Frames button to create your frames.
Frame Inspector

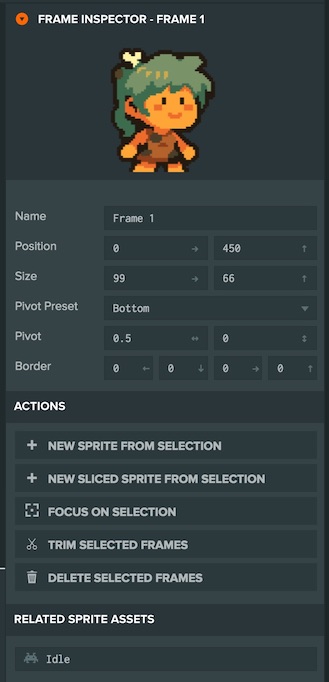
The Frame Inspector lets you set the properties for an individual frame or group of frames. It is visible when you select one or more Frames. The Frame Inspector is also where you create a new Sprite from.
The Inspector lets you modify the Position, Size and Border properties of the frame.
Frame Inspector Actions
- New Sprite From Selection - Create a new Sprite Asset and assign the frames that you have selected to the Sprite, in the order that they were selected.
- New Sliced Sprite From Selection - Create a new Sprite Asset and set its type to Sliced. Assign the frames that you have selected to the Sprite, in the order that they were selected.
- Focus on Selection - Focus the viewport on the selected Frames. [Keyboard Shortcut: F]
- Trim Selected Frames - Reduce the size of the selected frames to remove any excess empty space around an image. [Keyboard Shortcut: T]
- Delete Selected Frames - Delete the selected Frames [Keyboard Shortcut: Delete]
Sprite Inspector
![]()
The Sprite Inspector is visible when a Sprite Asset is selected. This inspector is used to edit the properties of one or more Sprites. See the Sprite Asset for more details on the properties.
Click the Add Frames to Sprite Asset button to enter the Sprite Edit Mode. In this mode, you can select multiple frames from the Frame Panel or Viewport and add them to the Sprite. Click the Add Selected Frames to add the frames to your Sprite.
Using the Sprite Inspector you can also re-order the Frames in your Sprite, or delete individual Frames.
Frames Panel
The Frames Panel lets you select and delete Frames from the Texture Atlas
Asset Panel
The Asset Panel shows you all the Sprite Assets that have been created from the current Texture Atlas. You can select Sprite Assets from this panel.
Artwork created by PixelBoy