Publishing
Publishing from the SuperSplat Editor uploads your edited splat to superspl.at, where it lands on your Manage page, gets a public scene page, and can be opened in Studio to curate the viewing experience (cameras, annotations, post effects, skybox, collision).
You can also publish without using the Editor. Hit the orange Upload Splat button on the superspl.at home page (or use the Direct Upload flow) to publish a ready-made splat file straight to your Manage page. Both paths land in the same place and share the same downstream tooling.
To self-host your own copy of the published viewer instead of (or in addition to) publishing to superspl.at, see Self-Hosting the Viewer.
Ensuring you are Logged In
Publishing splats requires you to be logged in.
Before you begin, you must have created a PlayCanvas account and be logged in at playcanvas.com. You must then also log in at superspl.at (via the Login button in the top right). Verify you are logged in by checking that your account avatar is displayed in the top right of the page on superspl.at.
Publishing your Splats
To publish your splat:
-
Open the
Filemenu. -
Select
Publish. -
Fill out the options in the Publish dialog:
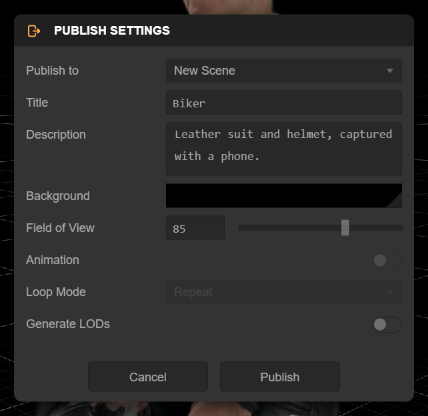
Option Description Publish to Select where to publish your scene. Choose New Scene (default) to publish a brand new scene on a new URL, or select one of your existing published scenes from the dropdown to overwrite it Title A short title that will appear below your splat's thumbnail once it is published Description A textual description of your splat that will be displayed under the splat on its viewer page Background The background color of the viewer. Defaults to the Editor's current background color (set in the Appearance popup) Field of View The vertical field of view of the viewer's camera in degrees. Defaults to the Editor camera's current setting Animation If enabled, the camera animation authored on the Timeline is baked into the scene and plays when it loads. Only available when the Timeline has keyframes (and enabled by default in that case) Loop Mode How an included camera animation plays back in the viewer:
• None: Play once and stop
• Repeat: Loop continuously
• Ping Pong: Play forwards, then backwards, repeatedly
Initialized from the Timeline's Loop toggle - Repeat if looping is enabled, None otherwiseGenerate LODs Generate levels of detail so the published splat is streamed progressively. Automatically enabled for scenes with 1 million or more splats that span a large area. See Streaming & Performance -
Select
Publish.
The published scene's camera starts at the pose your viewport camera has at the moment you publish, so frame your favorite view before opening the dialog.
New scenes are published unlisted - they are only discoverable by people who have the link. To make a splat appear in searches on the SuperSplat website, list it from your Manage page after publishing.
It may take several minutes to compress your splat to SOG format during the publishing process, so be patient! ⏳
Once the publish process is complete, a modal dialog will show with the URL of your published splat. Copy it and share it with whoever you like.
Republishing to an Existing Scene
Setting Publish to to one of your existing scenes overwrites that scene in place, keeping its URL. In this mode, two toggles choose what gets replaced:
| Option | Description |
|---|---|
| Override Model | Replace the scene's splat model with the currently loaded scene |
| Override Animation | Replace the scene's camera animation with the current Timeline animation |
At least one of the two must be enabled to publish. Overriding only the animation is a quick way to update a published camera path without re-uploading (and re-compressing) the splat data itself.
What's next?
- Your new splat now lives on the Manage page where you can edit its title, description, visibility, and downloadable license.
- Open it in Studio to add cameras, annotations, post effects, a skybox, or collision geometry.
- Visitors browse to its public scene page to view, share, embed, like, and (if you allow it) download.