State Graphs
A state graph is a state machine for the animation of a model. Its states are the things the model can be doing, such as idling, walking and jumping, and each plays a clip. Its transitions say how one state can lead to another: when, how quickly the clips cross-fade, and under what conditions. The conditions test parameters, values such as a character's speed that your code sets as the game runs. You set the parameters, and the graph chooses the clip.
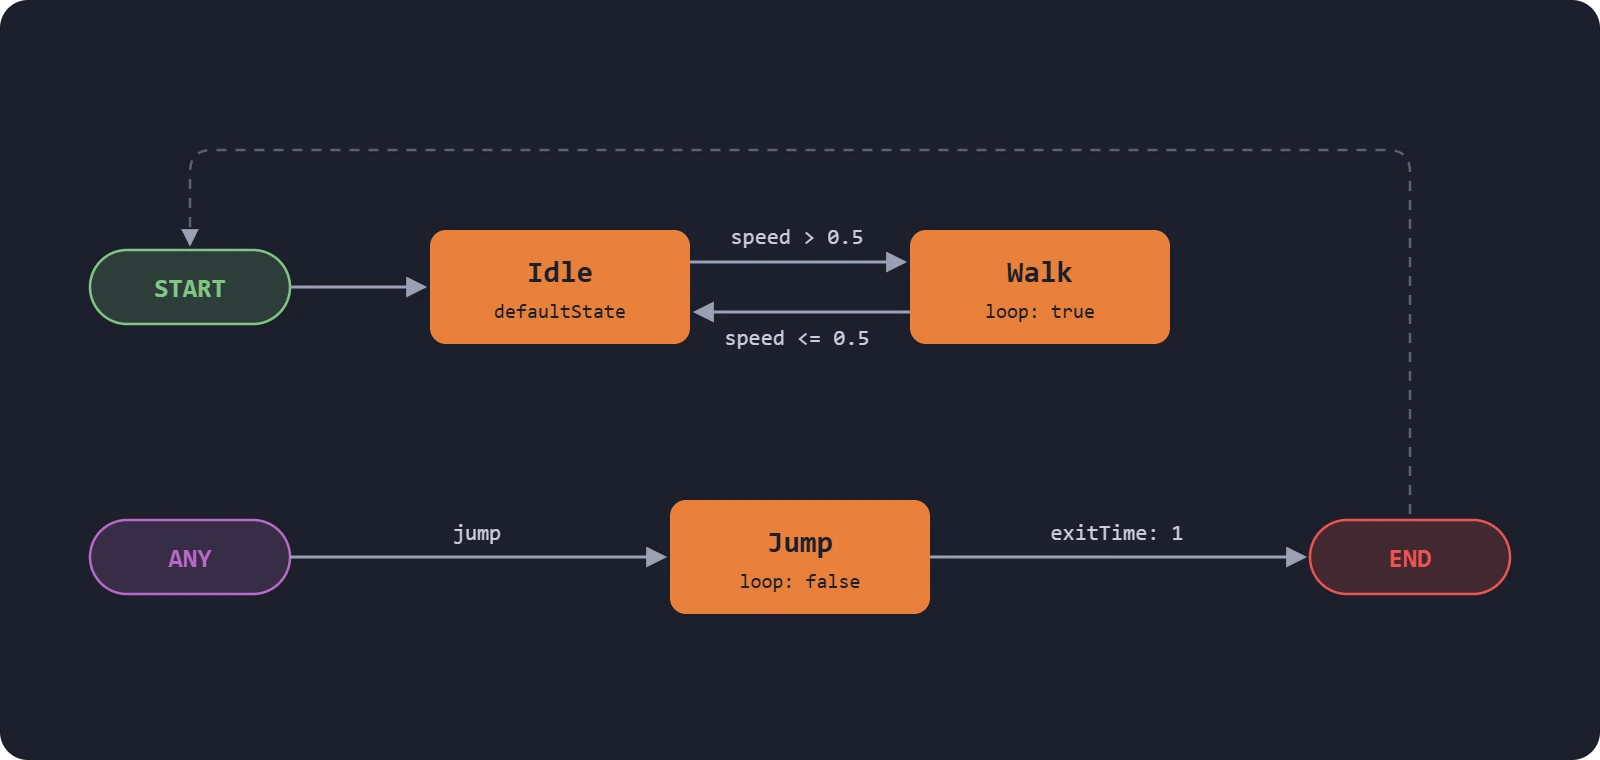
A state graph does not contain clips. It is a template, and each anim component that uses it links its states to clips of its own, so one graph can drive every character that moves in the same way, each with its own animations. A graph has at least one layer, and each layer is a state machine of its own; see Layers and Masks.
States
Only one state of a layer is active at a time. There are four kinds.
Animation States
An animation state plays a clip, or blends several with a blend tree. It has a name, which must be unique in its layer, a speed, which multiplies the speed of its clip, and a loop setting. A state that does not loop holds the last frame of its clip until a transition leaves it.
START
Every layer begins at START, which leads straight to the layer's default state. START can have no other transitions, from or to it.
END
A transition to END leaves the graph, which goes straight back to START and from there to the default state. Use it to return to the beginning from wherever a sequence of states finishes, without drawing a transition back.
ANY
Transitions from ANY can be taken from whichever state is active, as if they started from it. Use it for a state that every other state can lead to, such as a jump or a hit reaction, instead of a transition from each of them. There can be no transitions to ANY.
Transitions
A transition leads from one state to another. Its settings are:
| Setting | Description |
|---|---|
Duration (time) | How long the two states cross-fade, in seconds. 0 cuts straight to the next state. |
Exit time (exitTime) | When the transition can be taken, as a fraction of the source state's clip. A value below 1 makes it available at that point in every loop: 0.75 is three quarters of the way through each loop. 1 is the end of the first time through, and 2.5 is halfway through the third. Without an exit time, the transition can be taken at any time. |
Offset (transitionOffset) | Where the destination state's clip starts, as a fraction from 0 to 1 of its duration. |
Interruption source (interruptionSource) | Whether other transitions can interrupt this one while it cross-fades: none, those from the previous state, those from the next state, or both in either order. |
Conditions (conditions) | Tests of parameter values. The transition can only be taken when all of them pass. |
A transition with neither an exit time nor conditions is taken straight away, and a transition to the state that is already active is never taken. When several transitions can be taken at once, the one with the lowest priority wins, and those from the active state come before those from ANY.
Parameters and Conditions
Parameters are the inputs of a state graph. Each has a name, a type and a default value:
- Float, Integer and Boolean parameters hold the value you last set.
- A Trigger is a Boolean that resets itself to
falsewhen a transition uses it. Use one for an event that should cause one transition, such as a jump. A trigger stays set until a transition uses it, unless you passtrueas the second argument ofsetTrigger(), which resets it at the end of the frame even if no transition took it.
Set them on the anim component, by name:
entity.anim.setFloat('speed', 1.2);
entity.anim.setInteger('weapon', 2);
entity.anim.setBoolean('crouching', true);
entity.anim.setTrigger('jump');
A condition compares a parameter with a value, using one of the operators ==, !=, <, <=, > and >=. In data, these are pc.ANIM_EQUAL_TO, pc.ANIM_NOT_EQUAL_TO, pc.ANIM_LESS_THAN, pc.ANIM_LESS_THAN_EQUAL_TO, pc.ANIM_GREATER_THAN and pc.ANIM_GREATER_THAN_EQUAL_TO.
Building a State Graph
Here is the graph in the image above, as the data that the engine loads. The Editor builds the same data for you in its graph editor.
const stateGraph = {
    layers: [{
        name: 'Base',
        states: [
            { name: 'START' },
            { name: 'Idle', loop: true, defaultState: true },
            { name: 'Walk', loop: true },
            { name: 'Jump', loop: false },
            { name: 'ANY' },
            { name: 'END' }
        ],
        transitions: [
            { from: 'START', to: 'Idle' },
            { from: 'Idle', to: 'Walk', time: 0.2, conditions: [{ parameterName: 'speed', predicate: pc.ANIM_GREATER_THAN, value: 0.5 }] },
            { from: 'Walk', to: 'Idle', time: 0.2, conditions: [{ parameterName: 'speed', predicate: pc.ANIM_LESS_THAN_EQUAL_TO, value: 0.5 }] },
            { from: 'ANY', to: 'Jump', time: 0.1, conditions: [{ parameterName: 'jump', predicate: pc.ANIM_EQUAL_TO, value: true }] },
            { from: 'Jump', to: 'END', time: 0.2, exitTime: 1 }
        ]
    }],
    parameters: {
        speed: { name: 'speed', type: pc.ANIM_PARAMETER_FLOAT, value: 0 },
        jump: { name: 'jump', type: pc.ANIM_PARAMETER_TRIGGER, value: false }
    }
};
- Engine
- Editor
- React
- Web Components
Load the graph into the component, then link each state to a clip through the layer:
character.addComponent('anim', { activate: true });
character.anim.loadStateGraph(stateGraph);

const layer = character.anim.baseLayer;
layer.assignAnimation('Idle', idleTrack);
layer.assignAnimation('Walk', walkTrack);
layer.assignAnimation('Jump', jumpTrack);
Playback starts when every state has a clip.
The layer's assignAnimation() keeps the speed and loop that the graph gives each state. The component's own entity.anim.assignAnimation() replaces them with its arguments, which default to a speed of 1 and looping, so with it, Jump above would loop. Pass the values you want, or assign through the layer.
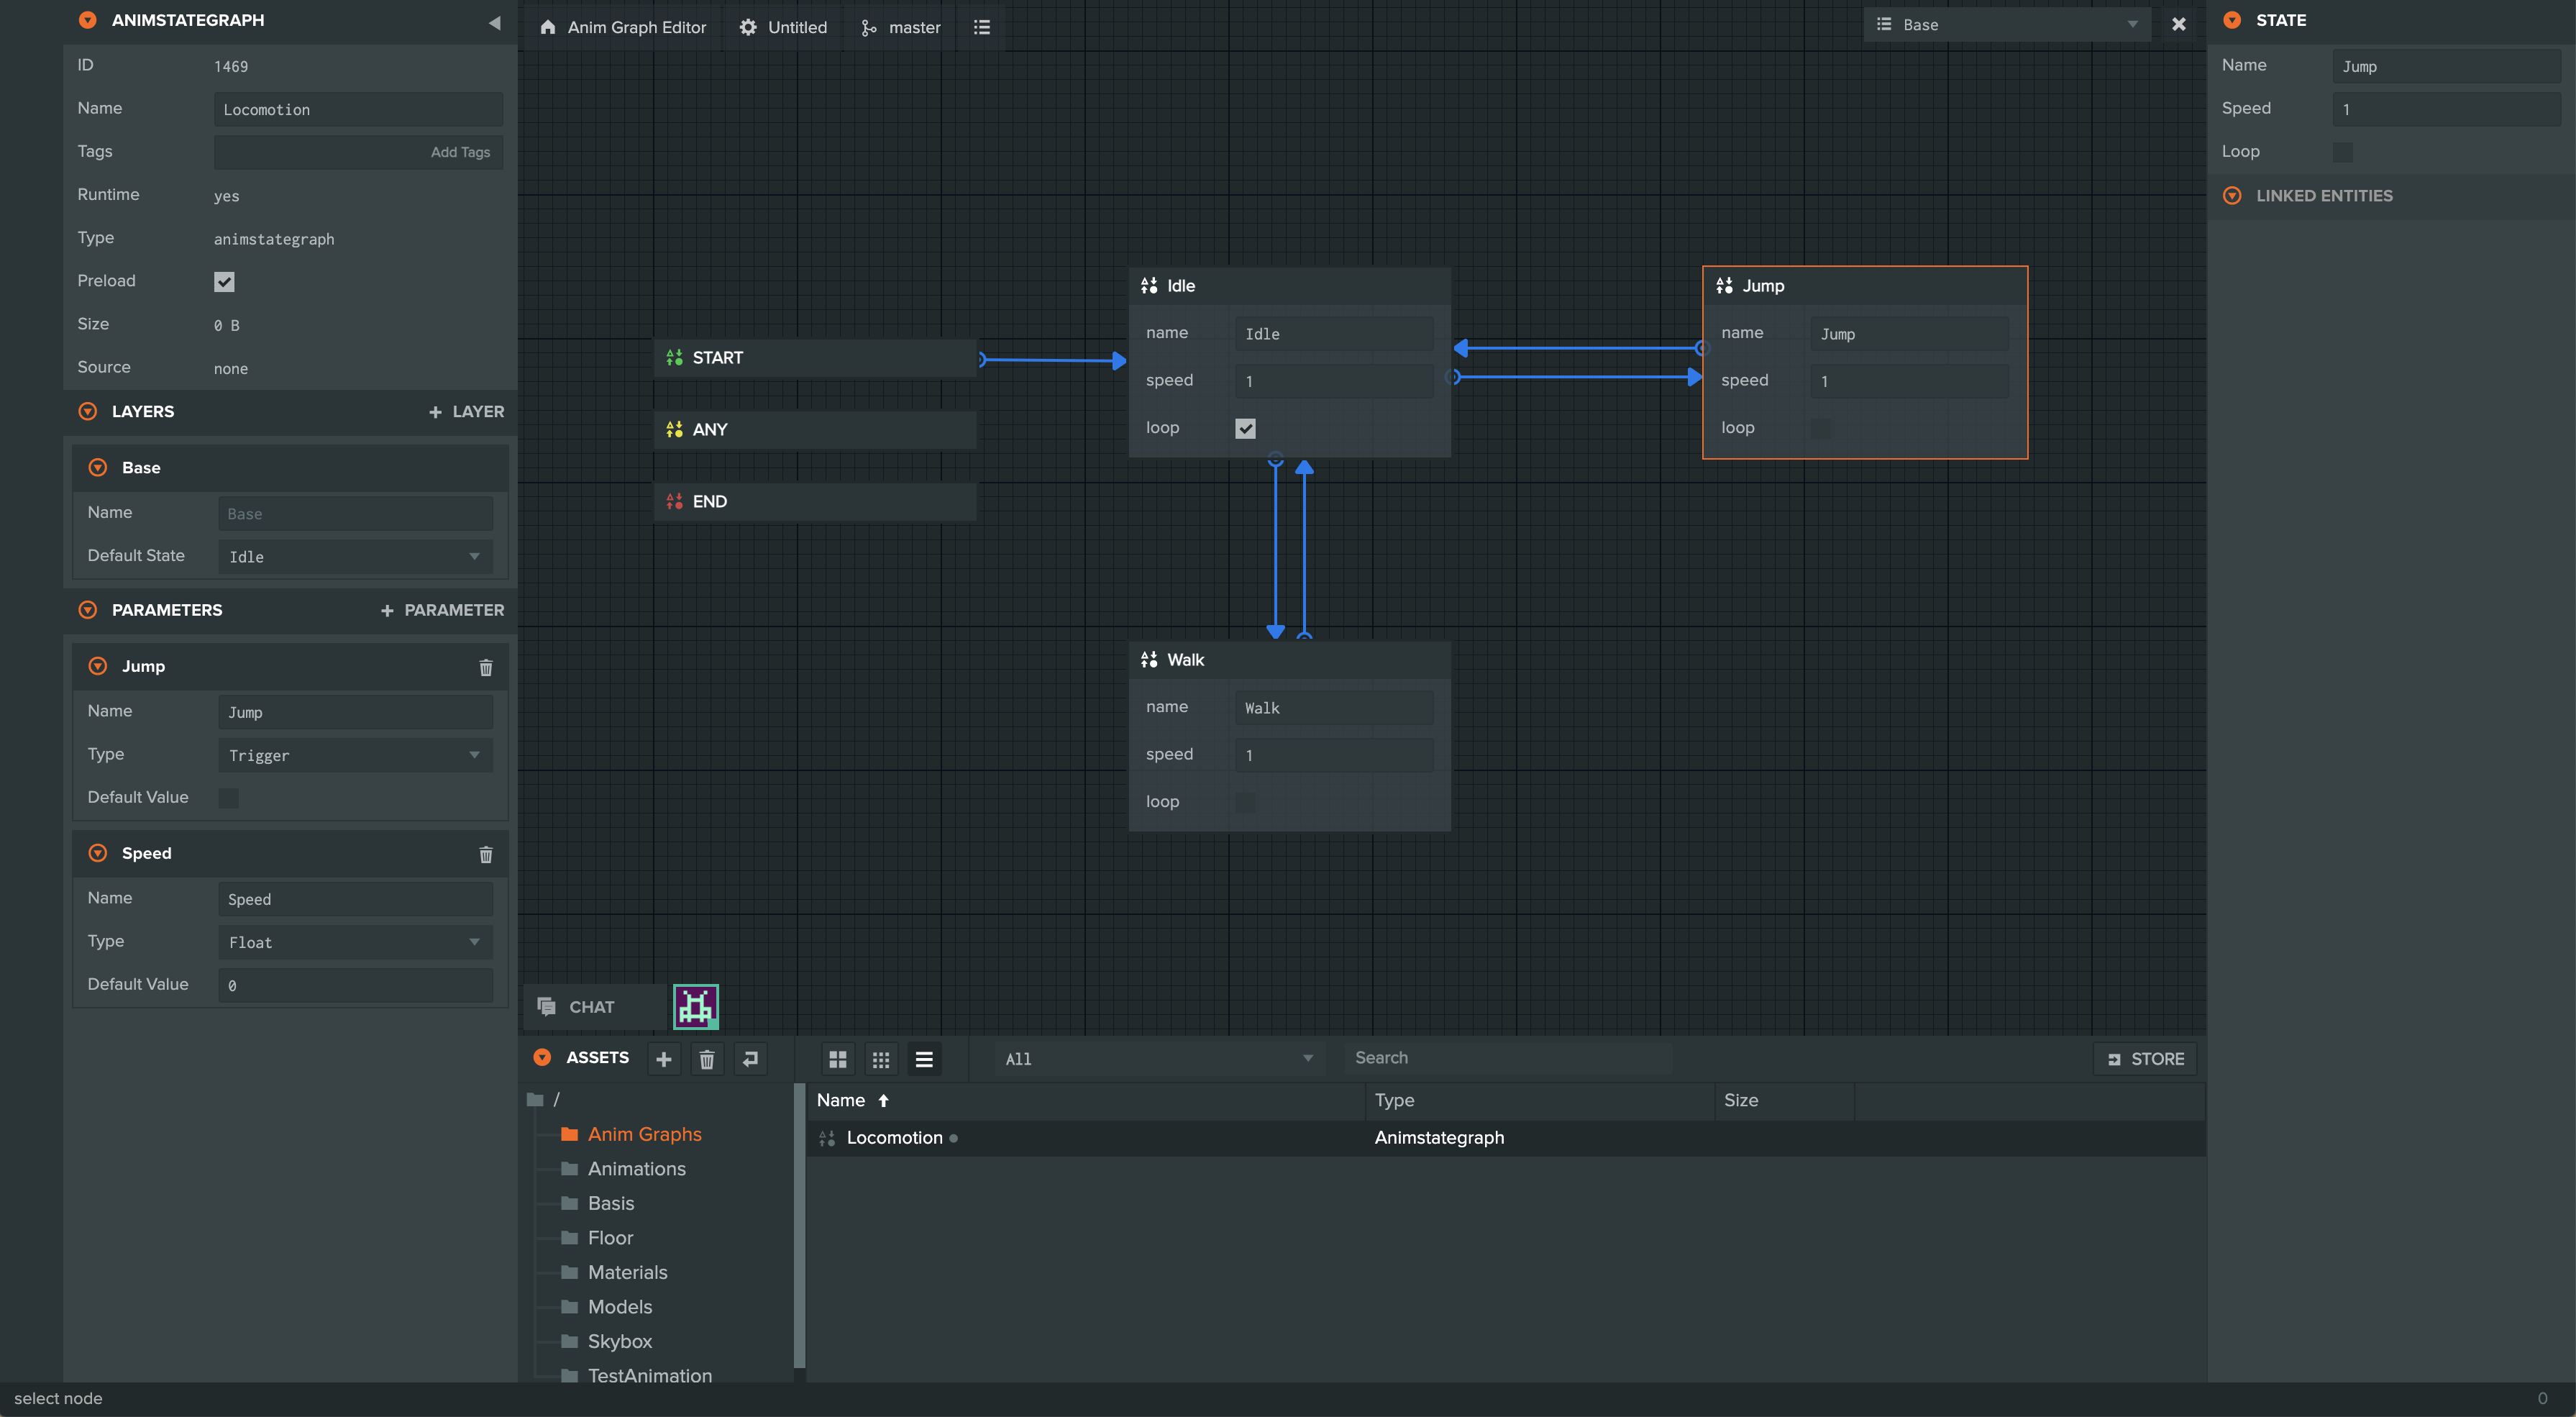
- In the Assets panel, click + and choose Anim State Graph. Select the new asset to open the graph editor.
- Right-click the empty canvas and choose Add new state for each state, and set its Name, Speed and Loop in the Inspector. Choose the Default State in the layer's settings on the left.
- Right-click a state and choose Add transition, then click the state it leads to. Select the transition's arrow to set its Duration, Offset and Interruption Source, turn on Has Exit Time to give it an Exit Time, and add conditions with New Condition. When there are several transitions between the same two states, drag them into priority order here.
- Add the parameters with + PARAMETER on the left.
- Select the entity's Anim component, choose the asset as its State Graph, and drag an animation asset into the slot of each state.
Load the graph and the clips into the engine component from a component of your own, placed in the model's <Entity> after its <Anim playing />:
import { useEffect } from 'react';
import { useParent } from '@playcanvas/react/hooks';

function Locomotion({ tracks }) {
  const entity = useParent();

  useEffect(() => {
    entity.anim.loadStateGraph(stateGraph);
    entity.anim.baseLayer.assignAnimation('Idle', tracks.idle);
    entity.anim.baseLayer.assignAnimation('Walk', tracks.walk);
    entity.anim.baseLayer.assignAnimation('Jump', tracks.jump);
  }, [entity, tracks]);

  return null;
}
<pc-anim> plays clips without a state graph, and replaces the graph of its component when its clips change. For a state graph, leave it out, and add the anim component to the model's entity from code:
<pc-asset id="character" src="character.glb"></pc-asset>
<pc-scene>
    <pc-model name="character" asset="character"></pc-model>
</pc-scene>

<script type="module">
    import { whenReady } from '@playcanvas/web-components';

    const model = await whenReady('pc-model[name="character"]');
    const container = document.getElementById('character').asset.resource;
    const tracks = Object.fromEntries(container.animations.map(animation => [animation.resource.name, animation.resource]));

    model.entity.addComponent('anim', { activate: true });
    model.entity.anim.loadStateGraph(stateGraph);
    model.entity.anim.baseLayer.assignAnimation('Idle', tracks.idle);
    model.entity.anim.baseLayer.assignAnimation('Walk', tracks.walk);
    model.entity.anim.baseLayer.assignAnimation('Jump', tracks.jump);
</script>
Driving a State Graph
Once the graph is loaded, set its parameters as the game runs, from whatever decides them: input, physics or game logic. Set a value every frame if it changes continuously, like a speed, and set a trigger when its event happens.
- Engine
- Editor
- React
- Web Components
app.on('update', () => {
    character.anim.setFloat('speed', velocity.length());
});
app.keyboard.on('keydown', (event) => {
    if (event.key === pc.KEY_SPACE) character.anim.setTrigger('jump');
});
Set the parameters from a script on the entity:
import { KEY_SPACE, KEY_UP, Script } from 'playcanvas';

export class CharacterAnimation extends Script {
    static scriptName = 'characterAnimation';

    update(dt) {
        const moving = this.app.keyboard.isPressed(KEY_UP);
        this.entity.anim.setFloat('speed', moving ? 1 : 0);

        if (this.app.keyboard.wasPressed(KEY_SPACE)) {
            this.entity.anim.setTrigger('jump');
        }
    }
}
Set a parameter when a prop changes:
function Speed({ value }) {
  const entity = useParent();

  useEffect(() => {
    entity.anim.setFloat('speed', value);
  }, [entity, value]);

  return null;
}
document.getElementById('jump-button').addEventListener('click', () => {
    model.entity.anim.setTrigger('jump');
});
To read where the graph is, a layer has activeState, the name of the active state, previousState and transitioning. Parameters can be read back with getFloat(), getInteger(), getBoolean() and getTrigger().
For complex graphs, ask an AI assistant through the Editor MCP Server to trace a failing transition across its conditions, parameters, scripts, and Anim mappings, then reproduce it in Launcher.
Example
This Engine app gives a robot arm a state graph. The arm idles until a work trigger is set. Then it picks something up and places it, and returns to idling. Each step of the cycle is a state that does not loop, left by a transition with an exit time of 1. Click the canvas to set the trigger.
import * as pc from 'playcanvas';

// create the application with the component systems and resource handlers it uses
const canvas = document.getElementById('application');
const device = await pc.createGraphicsDevice(canvas, {
    deviceTypes: [pc.DEVICETYPE_WEBGPU]
});
device.maxPixelRatio = Math.min(window.devicePixelRatio, 2);

const options = new pc.AppOptions();
options.graphicsDevice = device;
options.componentSystems = [
    pc.RenderComponentSystem,
    pc.CameraComponentSystem,
    pc.LightComponentSystem,
    pc.AnimComponentSystem
];
options.resourceHandlers = [pc.ContainerHandler, pc.TextureHandler];

const app = new pc.AppBase(canvas);
app.init(options);
app.setCanvasFillMode(pc.FILLMODE_FILL_WINDOW);
app.setCanvasResolution(pc.RESOLUTION_AUTO);
window.addEventListener('resize', () => app.resizeCanvas());
app.start();

app.scene.ambientLight = new pc.Color(0.35, 0.35, 0.4);

// load the robot arm, a GLB with five animations
const asset = new pc.Asset('robot-arm', 'container', {
    url: 'https://developer.playcanvas.com/assets/robot-arm.glb'
});
await new Promise((resolve) => {
    asset.ready(resolve);
    app.assets.add(asset);
    app.assets.load(asset);
});

const camera = new pc.Entity('camera');
camera.addComponent('camera', {
    clearColor: new pc.Color(0.11, 0.12, 0.17)
});
camera.setPosition(1.75, 1.4, 2.15);
camera.lookAt(0, 0.75, 0);
app.root.addChild(camera);

const light = new pc.Entity('light');
light.addComponent('light', {
    castShadows: true,
    shadowBias: 0.2,
    normalOffsetBias: 0.05
});
light.setEulerAngles(48, 38, 0);
app.root.addChild(light);

const floor = new pc.Entity('floor');
const floorMaterial = new pc.StandardMaterial();
floorMaterial.diffuse = new pc.Color(0.24, 0.26, 0.31);
floorMaterial.update();
floor.addComponent('render', { type: 'plane', material: floorMaterial });
floor.setLocalScale(20, 1, 20);
app.root.addChild(floor);

// create the arm's entities, and give its root an anim component
const arm = asset.resource.instantiateRenderEntity({ castShadows: true });
arm.addComponent('anim', { activate: true });
app.root.addChild(arm);

// the arm idles until it is told to work, then picks, places and goes back to idling
arm.anim.loadStateGraph({
    layers: [{
        name: 'Base',
        states: [
            { name: 'START' },
            { name: 'Idle', loop: true },
            { name: 'Pick', loop: false },
            { name: 'Place', loop: false }
        ],
        transitions: [
            { from: 'START', to: 'Idle' },
            // the work trigger starts a cycle, and is reset when this transition uses it
            { from: 'Idle', to: 'Pick', time: 0.4, conditions: [{ parameterName: 'work', predicate: pc.ANIM_EQUAL_TO, value: true }] },
            // once a clip has played through, cross-fade to the next one
            { from: 'Pick', to: 'Place', time: 0.4, exitTime: 1 },
            { from: 'Place', to: 'Idle', time: 0.4, exitTime: 1 }
        ]
    }],
    parameters: {
        work: { name: 'work', type: pc.ANIM_PARAMETER_TRIGGER, value: false }
    }
});

// link each state to a GLB animation, keeping the speed and loop the graph gave it
const tracks = Object.fromEntries(asset.resource.animations.map(animation => [animation.resource.name, animation.resource]));
arm.anim.baseLayer.assignAnimation('Idle', tracks.idle);
arm.anim.baseLayer.assignAnimation('Pick', tracks.pick);
arm.anim.baseLayer.assignAnimation('Place', tracks.place);

// click to set the trigger
canvas.addEventListener('click', () => {
    arm.anim.setTrigger('work');
});

const label = document.createElement('div');
label.style.cssText = 'position: absolute; left: 12px; bottom: 10px; color: #ccc; font: 14px sans-serif;';
document.body.appendChild(label);
app.on('update', () => {
    label.textContent = `State: ${arm.anim.baseLayer.activeState}. Click to start a work cycle.`;
});
Some things to try:
- Click again during a cycle. The trigger stays set until the arm is back in Idle, so it starts another cycle straight away.
- Change the exit time of the Pick transition to
0.5, and the arm moves on to placing before it has finished picking. - Add an
inspectstate with the arm'sinspectclip, and lead to it from Place instead of to Idle.
The Locomotion example drives a character's state graph with a speed integer and a jump trigger that leads from ANY. In the Examples Browser, click the floor to walk there, turn on Run in the controls panel to jog there instead, and press Jump at any time:
See Also
- Blend Trees - States that blend several clips
- Layers and Masks - Several state graphs on one model
- Anim State Graph Blending - Tutorial that builds a blended state graph in the Editor
- Anim Component - Linking a state graph's states to clips in the Editor
- AnimComponent and AnimComponentLayer - The engine API reference